创建简单的Bean容器
将Bean交给Spring管理后,Bean对象会被拆分成最基础的定义(类似零件),这种类似于解耦的操作,使得Spring更容易管理对象。而当我们需要获取Bean对象时,Spring又会对对象进行属性填充(逐步从基架填充成原来的Bean对象),这个过程包括 Bean 的初始化、属性填充等,最终我们就可以完整的使用一个 Bean 实例化后的对象了。
基于这个流程,我们选择使用HashMap来做对象存储的容器。整个流程分为定义->注册->获取三步。
- 定义:BeanDefinition
- 注册:相当于我们把数据存放到 HashMap 中
- 获取:Bean 的名字就是key,Spring 容器初始化好 Bean 以后,就可以直接获取了
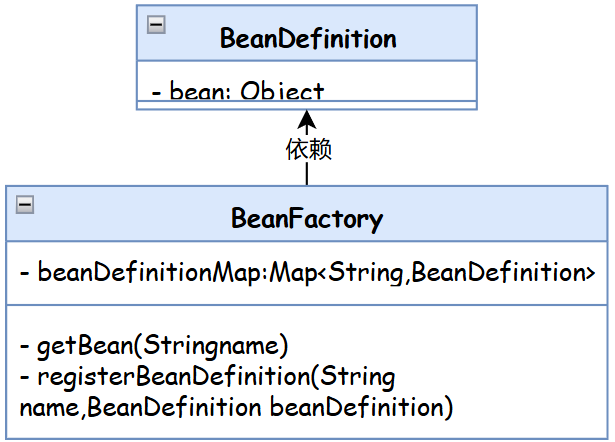
BeabDefinition(目前存放的只是最基本的Bean对象,稍后做其他属性填充)
public class BeanDefinition {

    private Object bean;

    public BeanDefinition(Object bean) {
        this.bean = bean;
    }

    public Object getBean() {
        return bean;
    }

}
BeanFactory
public class BeanFactory {

    private Map<String, BeanDefinition> beanDefinitionMap = new ConcurrentHashMap<>();

    public Object getBean(String name) {
        return beanDefinitionMap.get(name).getBean();
    }

    public void registerBeanDefinition(String name, BeanDefinition beanDefinition) {
        beanDefinitionMap.put(name, beanDefinition);
    }

}
至此,一个极为简单的Bean容器就已经初具雏形。
实现Bean的定义、注册、获取
我们之前将Bean注册到容器中是以Bean对象的形式,实际中应该是将类信息注册到Spring容器中。
首先我们需要定义 BeanFactory 这样一个 Bean 工厂,提供 Bean 的获取方法 getBean(String name),之后这个 Bean 工厂接口由抽象类 AbstractBeanFactory 实现。这样使用模板模式的设计方式,可以统一管理通用核心方法的调用逻辑和标准定义,也就很好的控制了后续的实现者而不用关心调用逻辑,按照统一方式执行。那么类的继承者只需要关心具体方法的逻辑实现即可。
那么在继承抽象类 AbstractBeanFactory 后的 AbstractAutowireCapableBeanFactory 就可以实现相应的抽象方法了,因为 AbstractAutowireCapableBeanFactory 本身也是一个抽象类,所以它只会实现属于自己的抽象方法,其他抽象方法由继承 AbstractAutowireCapableBeanFactory 的类实现。这里就体现了类实现过程中的各司其职,你只需要关心属于你的内容,不是你的内容,不要参与。
关于单例 SingletonBeanRegistry 的接口定义实现,而 DefaultSingletonBeanRegistry 对接口实现后,会被抽象类 AbstractBeanFactory 继承。现在 AbstractBeanFactory 就是一个非常完整且强大的抽象类了,也能非常好的体现出它对模板模式的抽象定义。
类关系:
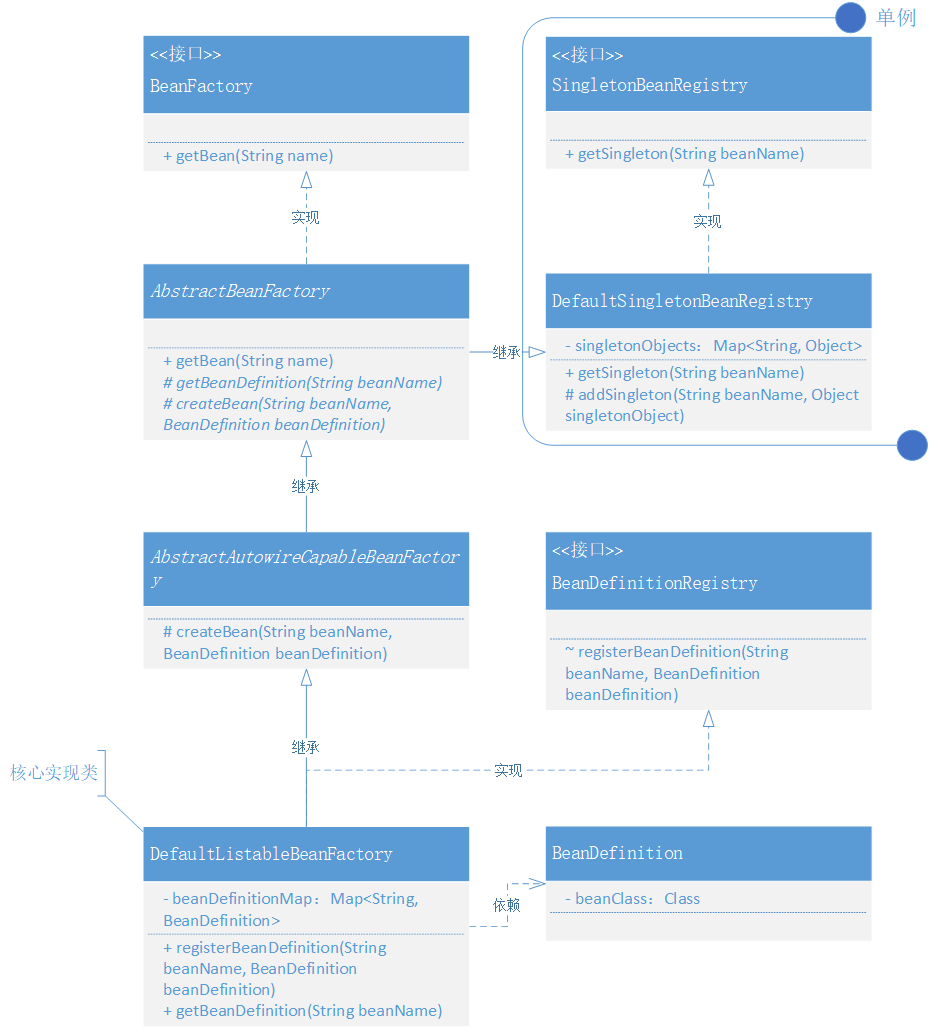
- BeanFactory 的定义由 AbstractBeanFactory 抽象类实现接口的 getBean 方法
- 而 AbstractBeanFactory 又继承了实现了 SingletonBeanRegistry 的DefaultSingletonBeanRegistry 类。这样 AbstractBeanFactory 抽象类就具备了单例 Bean 的注册功能。
- AbstractBeanFactory 中又定义了两个抽象方法:getBeanDefinition(String beanName)、createBean(String beanName, BeanDefinition beanDefinition) ,而这两个抽象方法分别由 DefaultListableBeanFactory、AbstractAutowireCapableBeanFactory 实现。
- 最终 DefaultListableBeanFactory 还会继承抽象类 AbstractAutowireCapableBeanFactory 也就可以调用抽象类中的 createBean 方法了。
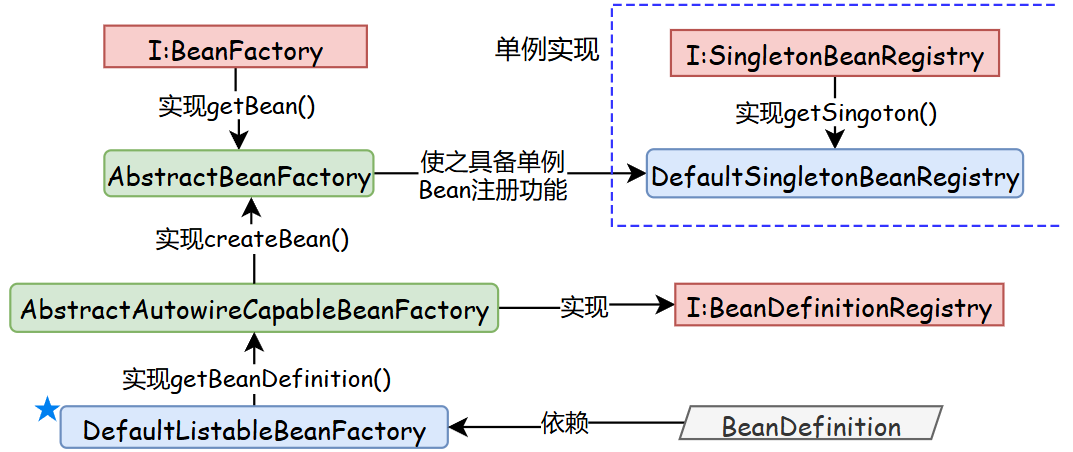
BeanDefinition 定义:
public class BeanDefinition {

    private Class beanClass;

    public BeanDefinition(Class beanClass) {
        this.beanClass = beanClass;
    }
        // ...get/set
}
Bean 的实例化操作是放在初始化调用阶段传递给 BeanDefinition 构造函数的。
单例注册接口定义和实现:
public interface SingletonBeanRegistry {
    Object getSingleton(String beanName);
}
实现:
public class DefaultSingletonBeanRegistry implements SingletonBeanRegistry {

    private Map<String, Object> singletonObjects = new HashMap<>();

    @Override
    public Object getSingleton(String beanName) {
        return singletonObjects.get(beanName);
    }

    protected void addSingleton(String beanName, Object singletonObject) {
        singletonObjects.put(beanName, singletonObject);
    }

}
注意,添加单例的方法被保护。
抽象类定义模板方法(AbstractBeanFactory):
public abstract class AbstractBeanFactory extends DefaultSingletonBeanRegistry implements BeanFactory {

    @Override
    public Object getBean(String name) throws BeansException {
        Object bean = getSingleton(name);
        if (bean != null) {
            return bean;
        }
        //拿不到Bean对象则创建一个Bean,具体创建方法交给子类实现
        BeanDefinition beanDefinition = getBeanDefinition(name);
        return createBean(name, beanDefinition);
    }

    protected abstract BeanDefinition getBeanDefinition(String beanName) throws BeansException;

    protected abstract Object createBean(String beanName, BeanDefinition beanDefinition) throws BeansException;

}
关于接口 BeanFactory 的实现,在方法 getBean 的实现过程中可以看到,主要是对单例 Bean 对象的获取以及在获取不到时需要拿到 Bean 的定义做相应 Bean 实例化操作。那么 getBean 并没有自身的去实现这些方法,而是只定义了调用过程以及提供了抽象方法,由实现此抽象类的其他类做相应实现。
实例化Bean类(AbstractAutowireCapableBeanFactory):
public abstract class AbstractAutowireCapableBeanFactory extends AbstractBeanFactory {

    @Override
    protected Object createBean(String beanName, BeanDefinition beanDefinition) throws BeansException {
        Object bean = null;
        try {
            bean = beanDefinition.getBeanClass().newInstance();
        } catch (InstantiationException | IllegalAccessException e) {
            throw new BeansException("Instantiation of bean failed", e);
        }

        addSingleton(beanName, bean);
        return bean;
    }

}
在处理完 Bean 对象的实例化后,直接调用 addSingleton 方法存放到单例对象的缓存中去。
思考:对于有构造函数入参的对象如何处理?
核心类实现(DefaultListableBeanFactory):
public class DefaultListableBeanFactory extends AbstractAutowireCapableBeanFactory implements BeanDefinitionRegistry {

    private Map<String, BeanDefinition> beanDefinitionMap = new HashMap<>();

    @Override
    public void registerBeanDefinition(String beanName, BeanDefinition beanDefinition) {
        beanDefinitionMap.put(beanName, beanDefinition);
    }

    @Override
    public BeanDefinition getBeanDefinition(String beanName) throws BeansException {
        BeanDefinition beanDefinition = beanDefinitionMap.get(beanName);
        if (beanDefinition == null) throw new BeansException("No bean named '" + beanName + "' is defined");
        return beanDefinition;
    }

}
- DefaultListableBeanFactory 继承了 AbstractAutowireCapableBeanFactory 类,也就具备了接口 BeanFactory 和 AbstractBeanFactory 等一连串的功能实现。所以有时候你会看到一些类的强转,调用某些方法,也是因为你强转的类实现接口或继承了某些类。
- 除此之外这个类还实现了接口 BeanDefinitionRegistry 中的 registerBeanDefinition(String beanName, BeanDefinition beanDefinition) 方法,当然你还会看到一个 getBeanDefinition 的实现,这个方法我们文中提到过它是抽象类 AbstractBeanFactory 中定义的抽象方法。现在注册Bean定义与获取Bean定义就可以同时使用了,是不感觉这个套路还蛮深的。接口定义了注册,抽象类定义了获取,都集中在 DefaultListableBeanFactory 中的 beanDefinitionMap里
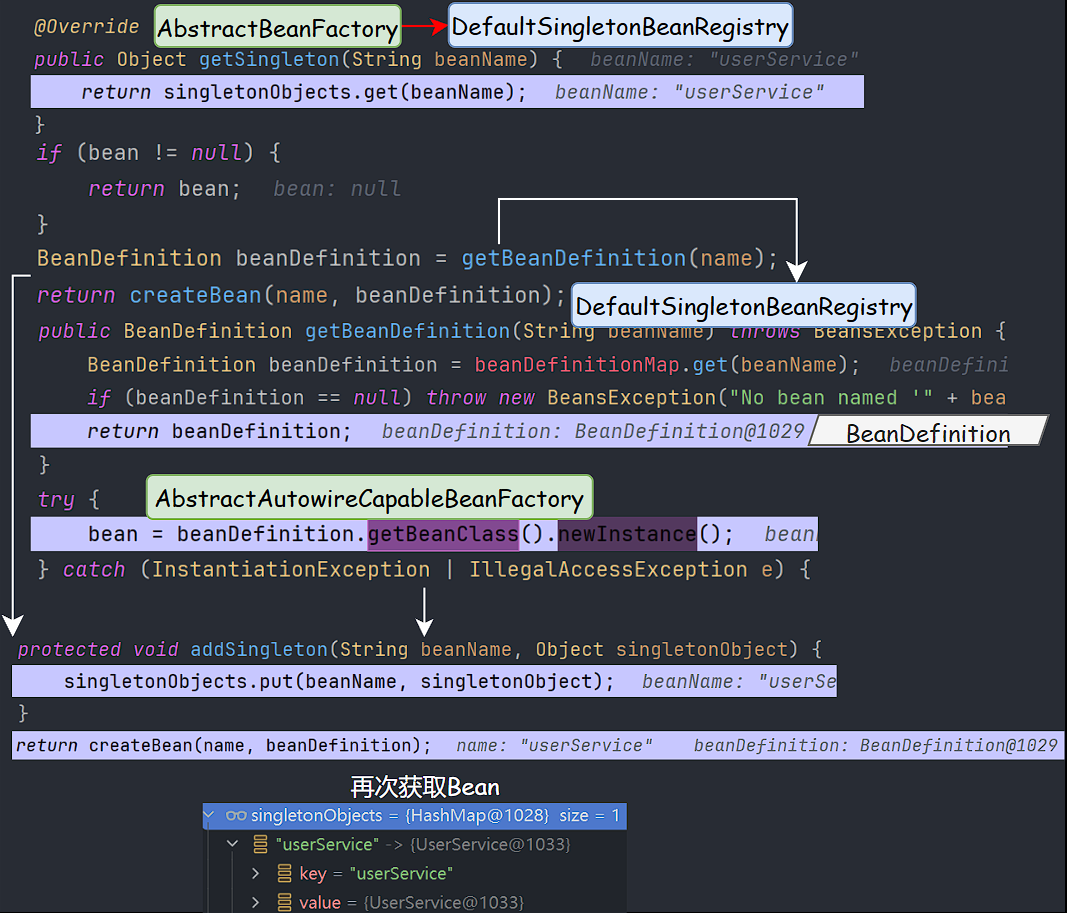
基于Cglib实现含构造函数的类实例化策略
首先明确一点,什么叫含构造函数的类实例化?(也就是我们上节留下的思考)
之前我们注入的Bean对象都是不含构造方法的
public void queryUserInfo(){
        System.out.println("查询用户信息");
    }
但现在我们要考虑的是,如果Bean中含有构造函数该如何进行注入和实例化?
public class UserService {
    private String name;
    public UserService(String name) {
        this.name = name;
    }
    // ...
}
之前的实例化方式并未考虑含构造方法的情况,如果还是沿用之前的策略,则会报如下错误:

从哪合理的把构造函数的入参信息传递到实例化操作里,怎么去实例化含有构造函数的对象?这是我们要思考的两个问题。

在原有的createBean()方法的基础上,添加实例化策略接口,补充相应getBean()入参信息:

新增 getBean 接口:
Object getBean(String name, Object... args) throws BeansException;
定义实例化策略接口:
public interface InstantiationStrategy {

    Object instantiate(BeanDefinition beanDefinition, String beanName, Constructor ctor, Object[] args) throws BeansException;

}
- 在实例化接口 instantiate 方法中添加必要的入参信息,包括:beanDefinition、 beanName、ctor、args
- 其中 Constructor 是 java.lang.reflect 包下的 Constructor 类,里面包含了一些必要的类信息,有这个参数的目的就是为了拿到符合入参信息相对应的构造函数。
- 而 args 是具体的入参信息,最终实例化会用到。
JDK 实例化:
public class SimpleInstantiationStrategy implements InstantiationStrategy {

    @Override
    public Object instantiate(BeanDefinition beanDefinition, String beanName, Constructor ctor, Object[] args) throws BeansException {
        Class clazz = beanDefinition.getBeanClass();
        try {
            if (null != ctor) {
                return clazz.getDeclaredConstructor(ctor.getParameterTypes()).newInstance(args);
            } else {
                return clazz.getDeclaredConstructor().newInstance();
            }
        } catch (NoSuchMethodException | InstantiationException | IllegalAccessException | InvocationTargetException e) {
            throw new BeansException("Failed to instantiate [" + clazz.getName() + "]", e);
        }
    }

}
首先通过BeanDefinition获取类对象,再通过Constructor判断该采用那种构造方法
若为有参构造,则通过反射拿到有参构造方法,再链式调用newInstance()方法创造对象:
clazz.getDeclaredConstructor(ctor.getParameterTypes()).newInstance(args);
Cglib 实例化:
public class CglibSubclassingInstantiationStrategy implements InstantiationStrategy {

    @Override
    public Object instantiate(BeanDefinition beanDefinition, String beanName, Constructor ctor, Object[] args) throws BeansException {
        Enhancer enhancer = new Enhancer();
        enhancer.setSuperclass(beanDefinition.getBeanClass());
        enhancer.setCallback(new NoOp() {
            @Override
            public int hashCode() {
                return super.hashCode();
            }
        });
        if (null == ctor) return enhancer.create();
        return enhancer.create(ctor.getParameterTypes(), args);
    }

}
- 创建Enhancer对象:Enhancer是CGLib库中的一个类,用于增强(或动态代理)一个类的功能。在这里,它被用来创建指定BeanDefinition中bean类的子类。
- 设置父类:通过enhancer.setSuperclass(beanDefinition.getBeanClass()),将bean定义中的类作为子类要扩展的父类。
- 设置回调方法:enhancer.setCallback(new NoOp() {...})这一行设置了回调接口。这里使用了一个NoOp匿名内部类,继承自CGLib的回调接口。NoOp表示不做任何操作,但通常这里可以设置拦截器或其他行为来增强实例化后的对象。
创建策略调用:
public abstract class AbstractAutowireCapableBeanFactory extends AbstractBeanFactory {

    private InstantiationStrategy instantiationStrategy = new CglibSubclassingInstantiationStrategy();

    @Override
    protected Object createBean(String beanName, BeanDefinition beanDefinition, Object[] args) throws BeansException {
        Object bean = null;
        try {
            bean = createBeanInstance(beanDefinition, beanName, args);
        } catch (Exception e) {
            throw new BeansException("Instantiation of bean failed", e);
        }

        addSingleton(beanName, bean);
        return bean;
    }

    protected Object createBeanInstance(BeanDefinition beanDefinition, String beanName, Object[] args) {
        Constructor constructorToUse = null;
        Class<?> beanClass = beanDefinition.getBeanClass();
        Constructor<?>[] declaredConstructors = beanClass.getDeclaredConstructors();
        for (Constructor ctor : declaredConstructors) {
            if (null != args && ctor.getParameterTypes().length == args.length) {
                constructorToUse = ctor;
                break;
            }
        }
        return getInstantiationStrategy().instantiate(beanDefinition, beanName, constructorToUse, args);
    }

}
- 我们这里考虑采用Cglib来实现实例化,跟之前不同的是,我们对createBean()方法进行了增强,具体是将调用实例化策略的职责交给了createBeanInstance()方法。
- 在createBeanInstance()方法中,我们先通过Constructor获取所有的构造方法,再把这个集合与传进来的参数个数作比较(实际上源码中是比较的类型和个数),直到找到合适的构造方法。

- 最后,调用InstantiationStrategy的实例化方实例化对象。
注入属性和依赖对象
这一节我们考虑的是如何实例化对象属性,我们考虑在createBean()方法中补全属性注入方法:
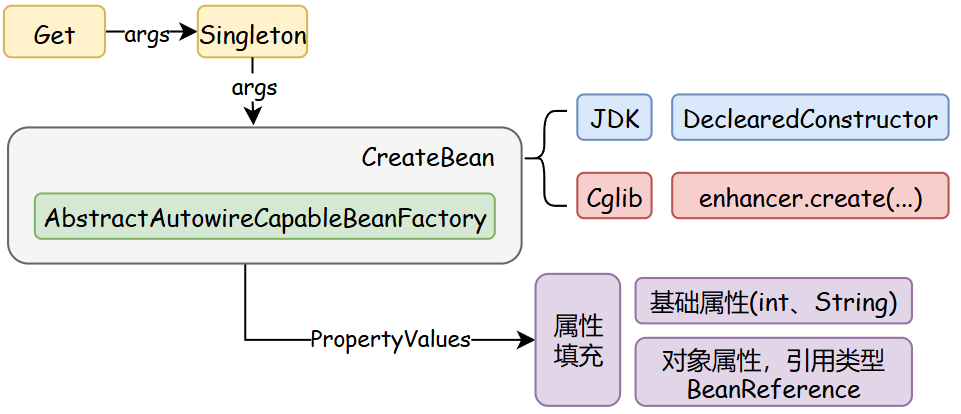
在方法执行时,我们只能拿到BeanDefinition作为Bean的信息来源,所以我们应该将相关属性放在BeanDefinition中。
注意一个特殊的属性:Bean的引用类型,也就是BeanReference,是一个接口。
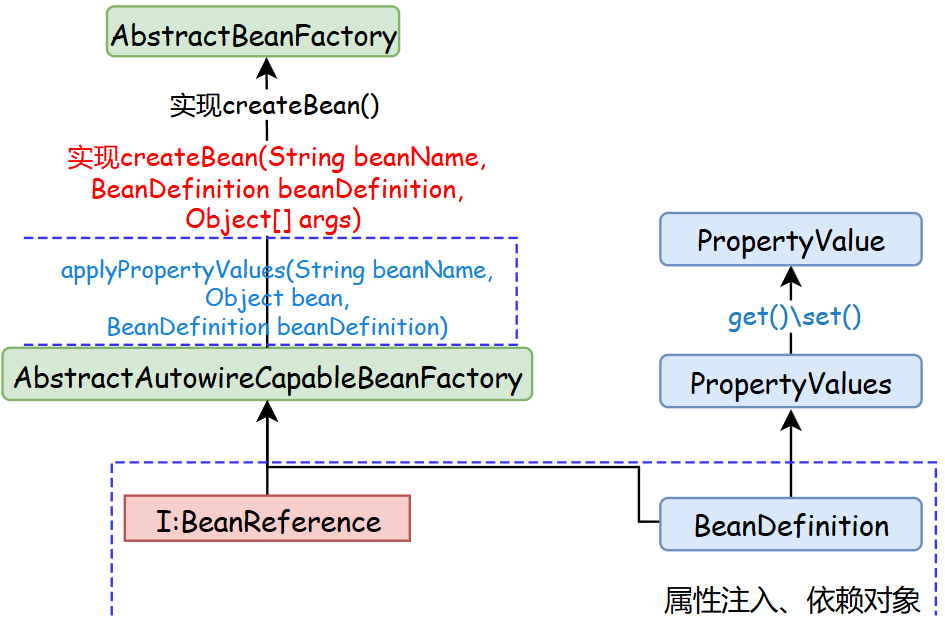
PropertyValue:
public class PropertyValue {

    private final String name;

    private final Object value;

    public PropertyValue(String name, Object value) {
        this.name = name;
        this.value = value;
    }

    // ...get/set
}
PropertyValues:
public class PropertyValues {

    private final List<PropertyValue> propertyValueList = new ArrayList<>();

    public void addPropertyValue(PropertyValue pv) {
        this.propertyValueList.add(pv);
    }

    public PropertyValue[] getPropertyValues() {
        return this.propertyValueList.toArray(new PropertyValue[0]);
    }

    public PropertyValue getPropertyValue(String propertyName) {
        for (PropertyValue pv : this.propertyValueList) {
            if (pv.getName().equals(propertyName)) {
                return pv;
            }
        }
        return null;
    }

}
属性比较多,这个类起包装的作用。
BeanDefinition:
public class BeanDefinition {

    private Class beanClass;

    private PropertyValues propertyValues;

    public BeanDefinition(Class beanClass) {
        this.beanClass = beanClass;
        this.propertyValues = new PropertyValues();
    }

    public BeanDefinition(Class beanClass, PropertyValues propertyValues) {
        this.beanClass = beanClass;
        this.propertyValues = propertyValues != null ? propertyValues : new PropertyValues();
    }

    // ...get/set
}
AbstractAutowireCapableBeanFactory:
    protected void applyPropertyValues(String beanName, Object bean, BeanDefinition beanDefinition) {
        try {
            PropertyValues propertyValues = beanDefinition.getPropertyValues();
            for (PropertyValue propertyValue : propertyValues.getPropertyValues()) {

                String name = propertyValue.getName();
                Object value = propertyValue.getValue();

                if (value instanceof BeanReference) {
                    // A 依赖 B,获取 B 的实例化
                    BeanReference beanReference = (BeanReference) value;
                    value = getBean(beanReference.getBeanName());
                }
                // 属性填充
                BeanUtil.setFieldValue(bean, name, value);
            }
        } catch (Exception e) {
            throw new BeansException("Error setting property values:" + beanName);
        }
    }
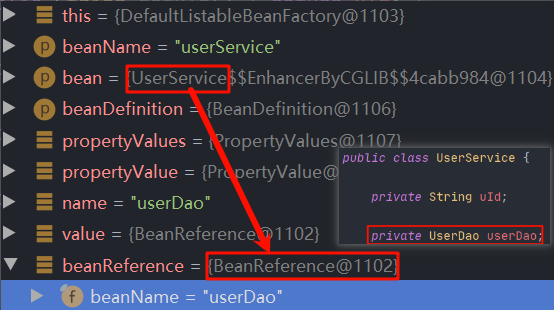
在 applyPropertyValues 中,通过获取 beanDefinition.getPropertyValues() 循环进行属性填充操作,如果遇到的是 BeanReference,那么就需要递归获取 Bean 实例,调用 getBean 方法。
属性的注入我们这里利用的是HuTools的setFieldValue():
public static void setFieldValue(Object obj, String fieldName, Object value) throws UtilException {
        Assert.notNull(obj);
        Assert.notBlank(fieldName);

        final Field field = getField((obj instanceof Class) ? (Class<?>) obj : obj.getClass(), fieldName);
        Assert.notNull(field, "Field [{}] is not exist in [{}]", fieldName, obj.getClass().getName());
        setFieldValue(obj, field, value);
    }
设计与实现资源加载器,从Spring.xml解析和注册Bean对象
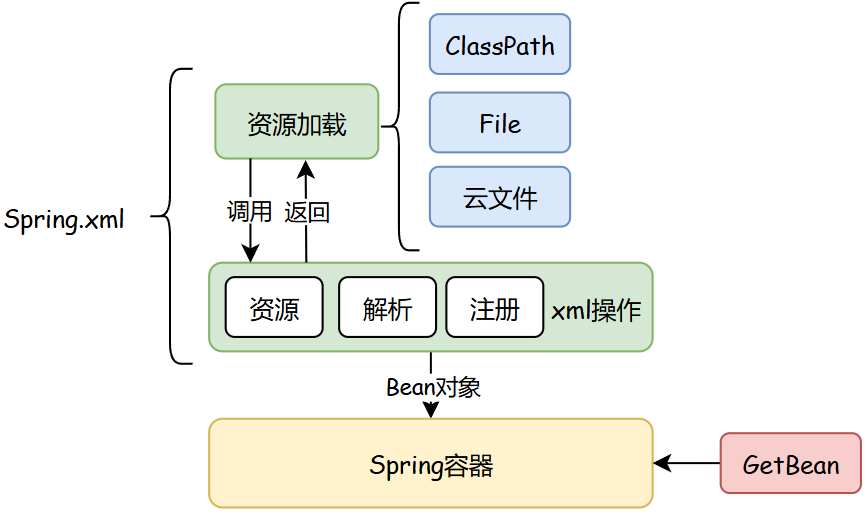
传统的Spring开发是基于XML文件的,不是像我们之前那样手动对Bean进行创建。也就是把下图中的部分提到XML中解析进行:
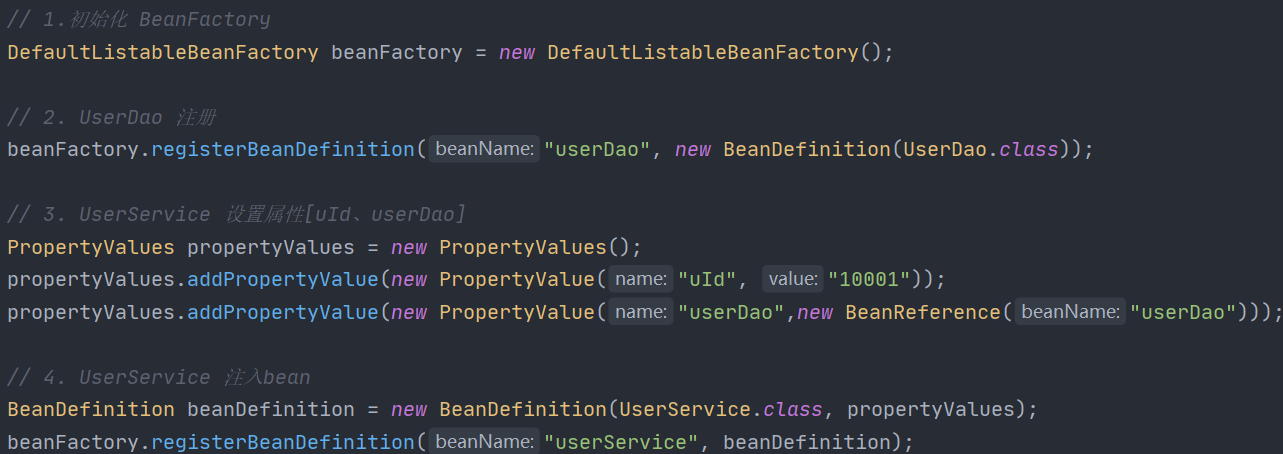
我们需要在现有的 Spring 框架雏形中添加一个资源解析器,也就是能读取classpath、本地文件和云文件的配置内容。这些配置内容就是像使用 Spring 时配置的 Spring.xml 一样,里面会包括 Bean 对象的描述和属性信息。 在读取配置文件信息后,接下来就是对配置文件中的 Bean 描述信息解析后进行注册操作,把 Bean 对象注册到 Spring 容器中。
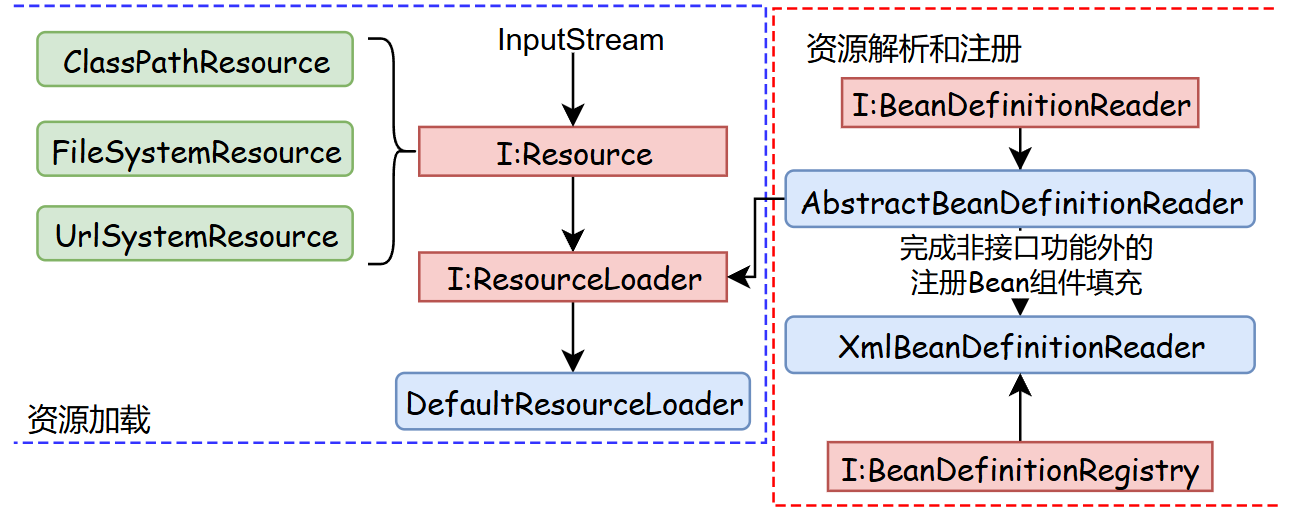
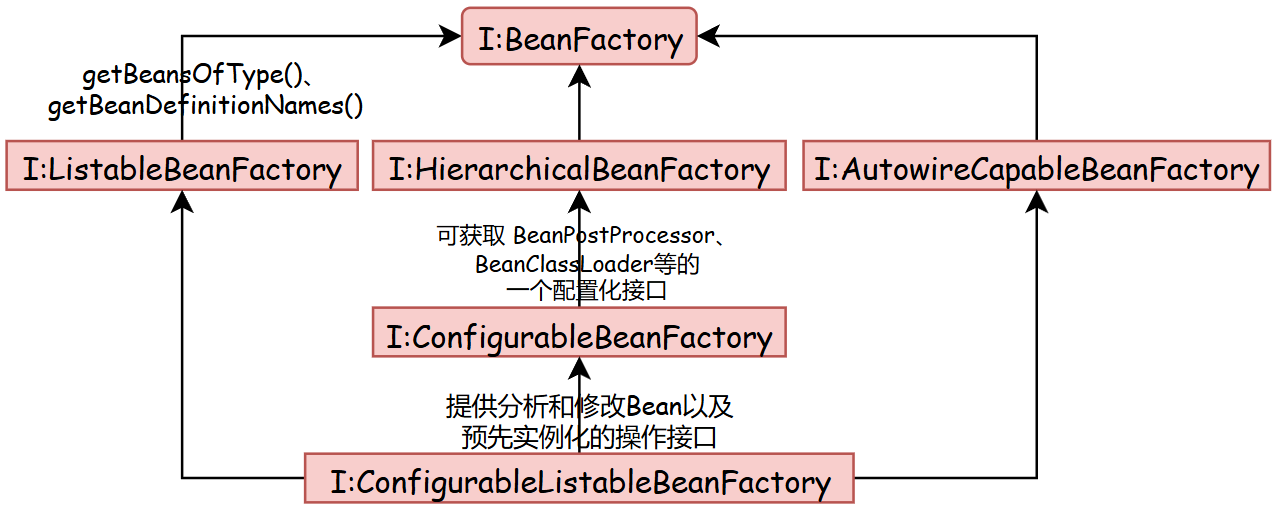
在本节中,我们还事先添加了部分接口的集成和实现关系,为后续做铺垫。
Resource:
public interface Resource {

    InputStream getInputStream() throws IOException;

}
ClassPathResource:
public class ClassPathResource implements Resource {

    private final String path;

    private ClassLoader classLoader;

    public ClassPathResource(String path) {
        this(path, (ClassLoader) null);
    }

    public ClassPathResource(String path, ClassLoader classLoader) {
        Assert.notNull(path, "Path must not be null");
        this.path = path;
        this.classLoader = (classLoader != null ? classLoader : ClassUtils.getDefaultClassLoader());
    }

    @Override
    public InputStream getInputStream() throws IOException {
        InputStream is = classLoader.getResourceAsStream(path);
        if (is == null) {
            throw new FileNotFoundException(
                    this.path + " cannot be opened because it does not exist");
        }
        return is;
    }
}
FileSystemResource:
public class FileSystemResource implements Resource {

    private final File file;

    private final String path;

    public FileSystemResource(File file) {
        this.file = file;
        this.path = file.getPath();
    }

    public FileSystemResource(String path) {
        this.file = new File(path);
        this.path = path;
    }

    @Override
    public InputStream getInputStream() throws IOException {
        return new FileInputStream(this.file);
    }

    public final String getPath() {
        return this.path;
    }

}
UrlResource:
public class UrlResource implements Resource{

    private final URL url;

    public UrlResource(URL url) {
        Assert.notNull(url,"URL must not be null");
        this.url = url;
    }

    @Override
    public InputStream getInputStream() throws IOException {
        URLConnection con = this.url.openConnection();
        try {
            return con.getInputStream();
        }
        catch (IOException ex){
            if (con instanceof HttpURLConnection){
                ((HttpURLConnection) con).disconnect();
            }
            throw ex;
        }
    }

}
ResourceLoader:
public interface ResourceLoader {

    /**
     * Pseudo URL prefix for loading from the class path: "classpath:"
     */
    String CLASSPATH_URL_PREFIX = "classpath:";

    Resource getResource(String location);

}
按照资源加载的不同方式,资源加载器可以把这些方式集中到统一的类服务下进行处理,外部用户只需要传递资源地址即可,简化使用。
DefaultResourceLoader:
public class DefaultResourceLoader implements ResourceLoader {

    @Override
    public Resource getResource(String location) {
        Assert.notNull(location, "Location must not be null");
        if (location.startsWith(CLASSPATH_URL_PREFIX)) {
            return new ClassPathResource(location.substring(CLASSPATH_URL_PREFIX.length()));
        }
        else {
            try {
                URL url = new URL(location);
                return new UrlResource(url);
            } catch (MalformedURLException e) {
                return new FileSystemResource(location);
            }
        }
    }

}
注意,ClassPath资源的读取略显特殊:
BeanDefinitionReader:
public interface BeanDefinitionReader {

    BeanDefinitionRegistry getRegistry();

    ResourceLoader getResourceLoader();

    void loadBeanDefinitions(Resource resource) throws BeansException;

    void loadBeanDefinitions(Resource... resources) throws BeansException;

    void loadBeanDefinitions(String location) throws BeansException;

}
AbstractBeanDefinitionReader:
public abstract class AbstractBeanDefinitionReader implements BeanDefinitionReader {

    private final BeanDefinitionRegistry registry;

    private ResourceLoader resourceLoader;

    protected AbstractBeanDefinitionReader(BeanDefinitionRegistry registry) {
        this(registry, new DefaultResourceLoader());
    }

    public AbstractBeanDefinitionReader(BeanDefinitionRegistry registry, ResourceLoader resourceLoader) {
        this.registry = registry;
        this.resourceLoader = resourceLoader;
    }

    @Override
    public BeanDefinitionRegistry getRegistry() {
        return registry;
    }

    @Override
    public ResourceLoader getResourceLoader() {
        return resourceLoader;
    }

}
- 抽象类把 BeanDefinitionReader 接口的前两个方法全部实现完了,并提供了构造函数,让外部的调用使用方,把Bean定义注入类,传递进来。
- 这样在接口 BeanDefinitionReader 的具体实现类中,就可以把解析后的 XML 文件中的 Bean 信息,注册到 Spring 容器去了。以前我们是通过单元测试使用,调用 BeanDefinitionRegistry 完成Bean的注册,现在可以放到 XMl 中操作了
XmlBeanDefinitionReader:
public class XmlBeanDefinitionReader extends AbstractBeanDefinitionReader {

    public XmlBeanDefinitionReader(BeanDefinitionRegistry registry) {
        super(registry);
    }

    public XmlBeanDefinitionReader(BeanDefinitionRegistry registry, ResourceLoader resourceLoader) {
        super(registry, resourceLoader);
    }

    @Override
    public void loadBeanDefinitions(Resource resource) throws BeansException {
        try {
            try (InputStream inputStream = resource.getInputStream()) {
                doLoadBeanDefinitions(inputStream);
            }
        } catch (IOException | ClassNotFoundException e) {
            throw new BeansException("IOException parsing XML document from " + resource, e);
        }
    }

    @Override
    public void loadBeanDefinitions(Resource... resources) throws BeansException {
        for (Resource resource : resources) {
            loadBeanDefinitions(resource);
        }
    }

    @Override
    public void loadBeanDefinitions(String location) throws BeansException {
        ResourceLoader resourceLoader = getResourceLoader();
        Resource resource = resourceLoader.getResource(location);
        loadBeanDefinitions(resource);
    }

    protected void doLoadBeanDefinitions(InputStream inputStream) throws ClassNotFoundException {
        Document doc = XmlUtil.readXML(inputStream);
        Element root = doc.getDocumentElement();
        NodeList childNodes = root.getChildNodes();

        for (int i = 0; i < childNodes.getLength(); i++) {
            // 判断元素
            if (!(childNodes.item(i) instanceof Element)) continue;
            // 判断对象
            if (!"bean".equals(childNodes.item(i).getNodeName())) continue;

            // 解析标签
            Element bean = (Element) childNodes.item(i);
            String id = bean.getAttribute("id");
            String name = bean.getAttribute("name");
            String className = bean.getAttribute("class");
            // 获取 Class,方便获取类中的名称
            Class<?> clazz = Class.forName(className);
            // 优先级 id > name
            String beanName = StrUtil.isNotEmpty(id) ? id : name;
            if (StrUtil.isEmpty(beanName)) {
                beanName = StrUtil.lowerFirst(clazz.getSimpleName());
            }

            // 定义Bean
            BeanDefinition beanDefinition = new BeanDefinition(clazz);
            // 读取属性并填充
            for (int j = 0; j < bean.getChildNodes().getLength(); j++) {
                if (!(bean.getChildNodes().item(j) instanceof Element)) continue;
                if (!"property".equals(bean.getChildNodes().item(j).getNodeName())) continue;
                // 解析标签:property
                Element property = (Element) bean.getChildNodes().item(j);
                String attrName = property.getAttribute("name");
                String attrValue = property.getAttribute("value");
                String attrRef = property.getAttribute("ref");
                // 获取属性值:引入对象、值对象
                Object value = StrUtil.isNotEmpty(attrRef) ? new BeanReference(attrRef) : attrValue;
                // 创建属性信息
                PropertyValue propertyValue = new PropertyValue(attrName, value);
                beanDefinition.getPropertyValues().addPropertyValue(propertyValue);
            }
            if (getRegistry().containsBeanDefinition(beanName)) {
                throw new BeansException("Duplicate beanName[" + beanName + "] is not allowed");
            }
            // 注册 BeanDefinition
            getRegistry().registerBeanDefinition(beanName, beanDefinition);
        }
    }

}
XmlBeanDefinitionReader 类最核心的内容就是对 XML 文件的解析,把我们本来在代码中的操作放到了通过解析 XML 自动注册的方式。
- loadBeanDefinitions 方法,处理资源加载,这里新增加了一个内部方法:
doLoadBeanDefinitions,它主要负责解析 xml - 在 doLoadBeanDefinitions 方法中,主要是对xml的读取
XmlUtil.readXML(inputStream)和元素 Element 解析。在解析的过程中通过循环操作,以此获取 Bean 配置以及配置中的 id、name、class、value、ref 信息。 - 最终把读取出来的配置信息,创建成 BeanDefinition 以及 PropertyValue,最终把完整的 Bean 定义内容注册到 Bean 容器:
getRegistry().registerBeanDefinition(beanName, beanDefinition)
配置测试环境:
<?xml version="1.0" encoding="UTF-8"?>
<beans>

    <bean id="userDao" class="cn.bugstack.springframework.test.bean.UserDao"/>

    <bean id="userService" class="cn.bugstack.springframework.test.bean.UserService">
        <property name="uId" value="10001"/>
        <property name="userDao" ref="userDao"/>
    </bean>

</beans>
在这份配置文件中,我们向容器中注入了两个Bean:UserDao、UserService,在UserService中还包含了对UserDao的引用。

实现应用上下文,自动识别、资源加载、扩展机制
目前设计存在的问题是,我们把面向Spring的部分组件直接暴露给用户使用:

本节的目标是:把Bean对象拓展机制功能和Spring框架的上下文包装起来交给用户使用。
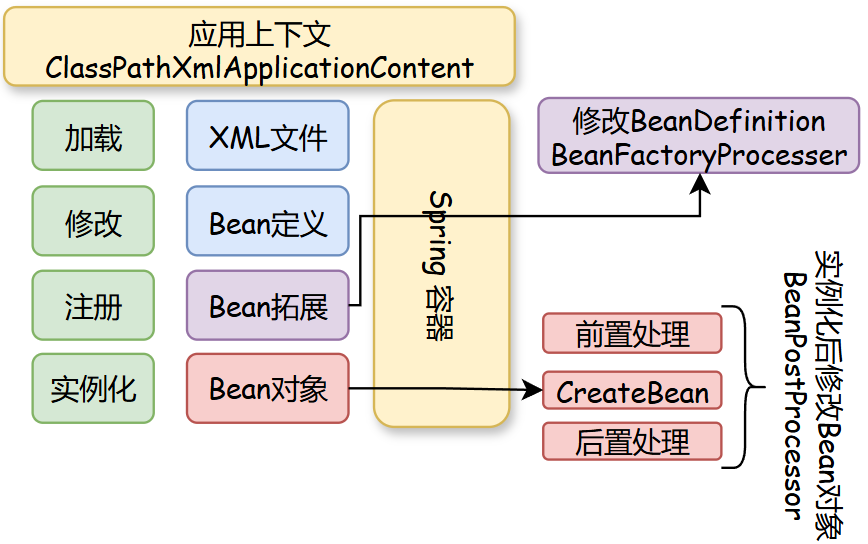
满足于对 Bean 对象扩展的两个接口,其实也是 Spring 框架中非常重量级的两个接口:BeanFactoryPostProcessor 和 BeanPostProcessor。
- BeanFactoryPostProcessor,是由 Spring 框架组建提供的容器扩展机制,允许在 Bean 对象注册后但未实例化之前,对 Bean 的定义信息
BeanDefinition执行修改操作。 - BeanPostProcessor,也是 Spring 提供的扩展机制,不过 BeanPostProcessor 是在 Bean 对象实例化之后修改 Bean 对象,也可以替换 Bean 对象。这是AOP实现的核心。
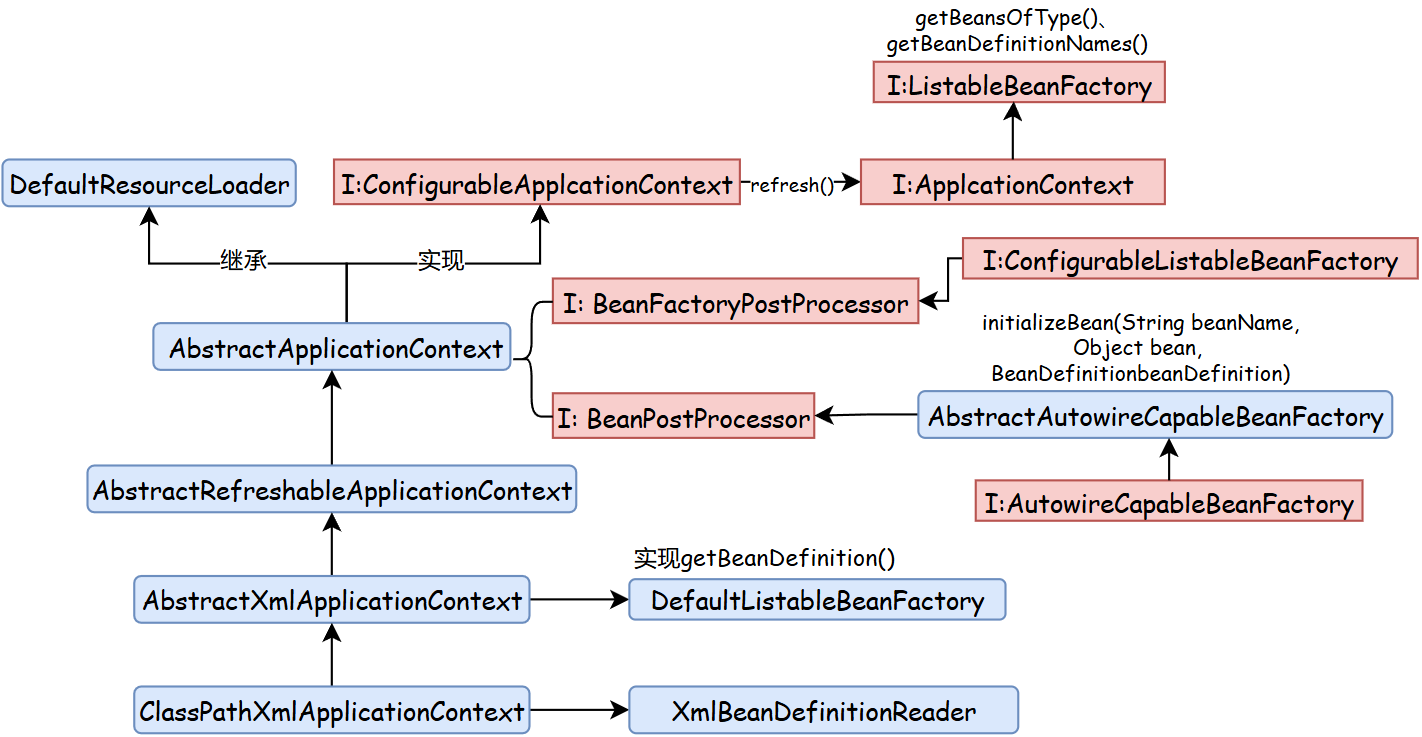
BeanFactoryPostProcessor:
public interface BeanFactoryPostProcessor {

    /**
     * 在所有的 BeanDefinition 加载完成后,实例化 Bean 对象之前,提供修改 BeanDefinition 属性的机制
     *
     * @param beanFactory
     * @throws BeansException
     */
    void postProcessBeanFactory(ConfigurableListableBeanFactory beanFactory) throws BeansException;

}
Allows for custom modification of an application context's bean definitions,adapting the bean property values of the context's underlying bean factory.
BeanPostProcessor:
public interface BeanPostProcessor {

    /**
     * 在 Bean 对象执行初始化方法之前,执行此方法
     *
     * @param bean
     * @param beanName
     * @return
     * @throws BeansException
     */
    Object postProcessBeforeInitialization(Object bean, String beanName) throws BeansException;

    /**
     * 在 Bean 对象执行初始化方法之后,执行此方法
     *
     * @param bean
     * @param beanName
     * @return
     * @throws BeansException
     */
    Object postProcessAfterInitialization(Object bean, String beanName) throws BeansException;

}
- 在 Spring 源码中有这样一段描述
Factory hook that allows for custom modification of new bean instances,e.g. checking for marker interfaces or wrapping them with proxies.也就是提供了修改新实例化 Bean 对象的扩展点。 - 另外此接口提供了两个方法:
postProcessBeforeInitialization用于在 Bean 对象执行初始化方法之前,执行此方法、postProcessAfterInitialization用于在 Bean 对象执行初始化方法之后,执行此方法。
ApplicationContext:
public interface ApplicationContext extends ListableBeanFactory {
}
- context 是本次实现应用上下文功能新增的服务包
- ApplicationContext 接口的定义是继承 BeanFactory 外新增加功能的接口,它可以满足于自动识别、资源加载、容器事件、监听器等功能,同时例如一些国际化支持、单例Bean自动初始化等,也是可以在这个类里实现和扩充的。
ConfigurableApplicationContext:
public interface ConfigurableApplicationContext extends ApplicationContext {

    /**
     * 刷新容器
     *
     * @throws BeansException
     */
    void refresh() throws BeansException;

}
ConfigurableApplicationContext 继承自 ApplicationContext,并提供了 refresh 这个核心方法。
AbstractApplicationContext:
public abstract class AbstractApplicationContext extends DefaultResourceLoader implements ConfigurableApplicationContext {

    @Override
    public void refresh() throws BeansException {
        // 1. 创建 BeanFactory,并加载 BeanDefinition
        refreshBeanFactory();

        // 2. 获取 BeanFactory
        ConfigurableListableBeanFactory beanFactory = getBeanFactory();

        // 3. 在 Bean 实例化之前,执行 BeanFactoryPostProcessor (Invoke factory processors registered as beans in the context.)
        invokeBeanFactoryPostProcessors(beanFactory);

        // 4. BeanPostProcessor 需要提前于其他 Bean 对象实例化之前执行注册操作
        registerBeanPostProcessors(beanFactory);

        // 5. 提前实例化单例Bean对象
        beanFactory.preInstantiateSingletons();
    }

    protected abstract void refreshBeanFactory() throws BeansException;

    protected abstract ConfigurableListableBeanFactory getBeanFactory();

    private void invokeBeanFactoryPostProcessors(ConfigurableListableBeanFactory beanFactory) {
        Map<String, BeanFactoryPostProcessor> beanFactoryPostProcessorMap = beanFactory.getBeansOfType(BeanFactoryPostProcessor.class);
        for (BeanFactoryPostProcessor beanFactoryPostProcessor : beanFactoryPostProcessorMap.values()) {
            beanFactoryPostProcessor.postProcessBeanFactory(beanFactory);
        }
    }

    private void registerBeanPostProcessors(ConfigurableListableBeanFactory beanFactory) {
        Map<String, BeanPostProcessor> beanPostProcessorMap = beanFactory.getBeansOfType(BeanPostProcessor.class);
        for (BeanPostProcessor beanPostProcessor : beanPostProcessorMap.values()) {
            beanFactory.addBeanPostProcessor(beanPostProcessor);
        }
    }

    //... getBean、getBeansOfType、getBeanDefinitionNames 方法

}
AbstractApplicationContext 继承 DefaultResourceLoader 是为了处理 spring.xml 配置资源的加载。
之后是在 refresh() 定义实现过程,包括:
- 创建 BeanFactory,并加载 BeanDefinition
- 获取 BeanFactory
- 在 Bean 实例化之前,执行 BeanFactoryPostProcessor (Invoke factory processors registered as beans in the context.)
- BeanPostProcessor 需要提前于其他 Bean 对象实例化之前执行注册操作
- 提前实例化单例Bean对象
另外把定义出来的抽象方法,refreshBeanFactory()、getBeanFactory() 由后面的继承此抽象类的其他抽象类实现。
AbstractRefreshableApplicationContext:
public abstract class AbstractRefreshableApplicationContext extends AbstractApplicationContext {

    private DefaultListableBeanFactory beanFactory;

    @Override
    protected void refreshBeanFactory() throws BeansException {
        DefaultListableBeanFactory beanFactory = createBeanFactory();
        loadBeanDefinitions(beanFactory);
        this.beanFactory = beanFactory;
    }

    private DefaultListableBeanFactory createBeanFactory() {
        return new DefaultListableBeanFactory();
    }

    protected abstract void loadBeanDefinitions(DefaultListableBeanFactory beanFactory);

    @Override
    protected ConfigurableListableBeanFactory getBeanFactory() {
        return beanFactory;
    }

}
- 在 refreshBeanFactory() 中主要是获取了
DefaultListableBeanFactory的实例化以及对资源配置的加载操作loadBeanDefinitions(beanFactory),在加载完成后即可完成对 spring.xml 配置文件中 Bean 对象的定义和注册,同时也包括实现了接口 BeanFactoryPostProcessor、BeanPostProcessor 的配置 Bean 信息。 - 但此时资源加载还只是定义了一个抽象类方法
loadBeanDefinitions(DefaultListableBeanFactory beanFactory),继续由其他抽象类继承实现。
AbstractXmlApplicationContext:
public abstract class AbstractXmlApplicationContext extends AbstractRefreshableApplicationContext {

    @Override
    protected void loadBeanDefinitions(DefaultListableBeanFactory beanFactory) {
        XmlBeanDefinitionReader beanDefinitionReader = new XmlBeanDefinitionReader(beanFactory, this);
        String[] configLocations = getConfigLocations();
        if (null != configLocations){
            beanDefinitionReader.loadBeanDefinitions(configLocations);
        }
    }

    protected abstract String[] getConfigLocations();

}
- 在 AbstractXmlApplicationContext 抽象类的 loadBeanDefinitions 方法实现中,使用 XmlBeanDefinitionReader 类,处理了关于 XML 文件配置信息的操作。
- 同时这里又留下了一个抽象类方法,getConfigLocations(),此方法是为了从入口上下文类,拿到配置信息的地址描述。
ClassPathXmlApplicationContext:
public class ClassPathXmlApplicationContext extends AbstractXmlApplicationContext {

    private String[] configLocations;

    public ClassPathXmlApplicationContext() {
    }

    /**
     * 从 XML 中加载 BeanDefinition,并刷新上下文
     *
     * @param configLocations
     * @throws BeansException
     */
    public ClassPathXmlApplicationContext(String configLocations) throws BeansException {
        this(new String[]{configLocations});
    }

    /**
     * 从 XML 中加载 BeanDefinition,并刷新上下文
     * @param configLocations
     * @throws BeansException
     */
    public ClassPathXmlApplicationContext(String[] configLocations) throws BeansException {
        this.configLocations = configLocations;
        refresh();
    }

    @Override
    protected String[] getConfigLocations() {
        return configLocations;
    }

}
- ClassPathXmlApplicationContext,是具体对外给用户提供的应用上下文方法。
- 在继承了 AbstractXmlApplicationContext 以及层层抽象类的功能分离实现后,在此类 ClassPathXmlApplicationContext 的实现中就简单多了,主要是对继承抽象类中方法的调用和提供了配置文件地址信息。
AbstractAutowireCapableBeanFactory:
public abstract class AbstractAutowireCapableBeanFactory extends AbstractBeanFactory implements AutowireCapableBeanFactory {

    private InstantiationStrategy instantiationStrategy = new CglibSubclassingInstantiationStrategy();

    @Override
    protected Object createBean(String beanName, BeanDefinition beanDefinition, Object[] args) throws BeansException {
        Object bean = null;
        try {
            bean = createBeanInstance(beanDefinition, beanName, args);
            // 给 Bean 填充属性
            applyPropertyValues(beanName, bean, beanDefinition);
            // 执行 Bean 的初始化方法和 BeanPostProcessor 的前置和后置处理方法
            bean = initializeBean(beanName, bean, beanDefinition);
        } catch (Exception e) {
            throw new BeansException("Instantiation of bean failed", e);
        }

        addSingleton(beanName, bean);
        return bean;
    }

    public InstantiationStrategy getInstantiationStrategy() {
        return instantiationStrategy;
    }

    public void setInstantiationStrategy(InstantiationStrategy instantiationStrategy) {
        this.instantiationStrategy = instantiationStrategy;
    }

    private Object initializeBean(String beanName, Object bean, BeanDefinition beanDefinition) {
        // 1. 执行 BeanPostProcessor Before 处理
        Object wrappedBean = applyBeanPostProcessorsBeforeInitialization(bean, beanName);

        // 待完成内容:invokeInitMethods(beanName, wrappedBean, beanDefinition);
        invokeInitMethods(beanName, wrappedBean, beanDefinition);

        // 2. 执行 BeanPostProcessor After 处理
        wrappedBean = applyBeanPostProcessorsAfterInitialization(bean, beanName);
        return wrappedBean;
    }

    private void invokeInitMethods(String beanName, Object wrappedBean, BeanDefinition beanDefinition) {

    }

    @Override
    public Object applyBeanPostProcessorsBeforeInitialization(Object existingBean, String beanName) throws BeansException {
        Object result = existingBean;
        for (BeanPostProcessor processor : getBeanPostProcessors()) {
            Object current = processor.postProcessBeforeInitialization(result, beanName);
            if (null == current) return result;
            result = current;
        }
        return result;
    }

    @Override
    public Object applyBeanPostProcessorsAfterInitialization(Object existingBean, String beanName) throws BeansException {
        Object result = existingBean;
        for (BeanPostProcessor processor : getBeanPostProcessors()) {
            Object current = processor.postProcessAfterInitialization(result, beanName);
            if (null == current) return result;
            result = current;
        }
        return result;
    }

}
- 实现 BeanPostProcessor 接口后,会涉及到两个接口方法,
postProcessBeforeInitialization、postProcessAfterInitialization,分别作用于 Bean 对象执行初始化前后的额外处理。 - 也就是需要在创建 Bean 对象时,在 createBean 方法中添加
initializeBean(beanName, bean, beanDefinition);操作。而这个操作主要主要是对于方法applyBeanPostProcessorsBeforeInitialization、applyBeanPostProcessorsAfterInitialization的使用。 - 另外需要提一下,applyBeanPostProcessorsBeforeInitialization、applyBeanPostProcessorsAfterInitialization 两个方法是在接口类
AutowireCapableBeanFactory中新增加的。
测试: 实现自定义BeanFactoryPostProcessor:
public class MyBeanFactoryPostProcessor implements BeanFactoryPostProcessor {

    @Override
    public void postProcessBeanFactory(ConfigurableListableBeanFactory beanFactory) throws BeansException {

        BeanDefinition beanDefinition = beanFactory.getBeanDefinition("userService");
        PropertyValues propertyValues = beanDefinition.getPropertyValues();

        propertyValues.addPropertyValue(new PropertyValue("company", "改为:字节跳动"));
    }

}
实现BeanPostProcessor:
public class MyBeanPostProcessor implements BeanPostProcessor {

    @Override
    public Object postProcessBeforeInitialization(Object bean, String beanName) throws BeansException {
        if ("userService".equals(beanName)) {
            UserService userService = (UserService) bean;
            userService.setLocation("改为:北京");
        }
        return bean;
    }

    @Override
    public Object postProcessAfterInitialization(Object bean, String beanName) throws BeansException {
        return bean;
    }

}
实现Bean对象的初始化和销毁方法
本节实现的是Bean的生命流程中的以下步骤:
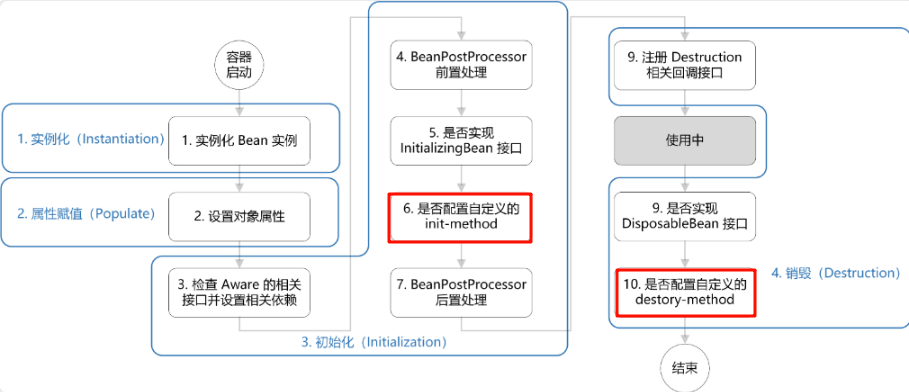
在XML配置方式中,存在以下配置:

对于这样在 Bean 容器初始化过程中额外添加的处理操作,无非就是预先执行了一个定义好的接口方法或者是反射调用类中xml中配置的方法,最终你只要按照接口定义实现,就会有 Spring 容器在处理的过程中进行调用而已。
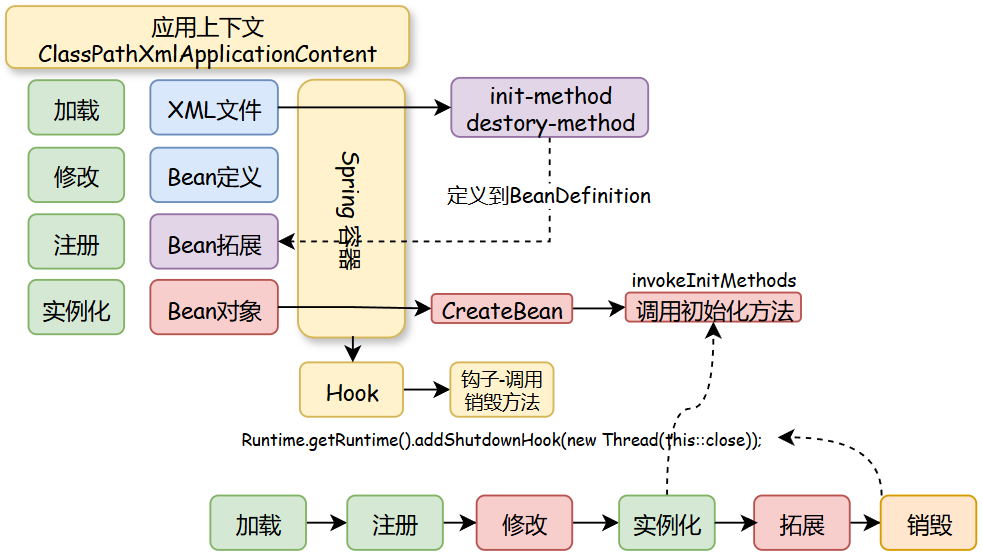
在 spring.xml 配置中添加 init-method、destroy-method 两个注解,在配置文件加载的过程中,把注解配置一并定义到 BeanDefinition 的属性当中。这样在 initializeBean 初始化操作的工程中,就可以通过反射的方式来调用配置在 Bean 定义属性当中的方法信息了。
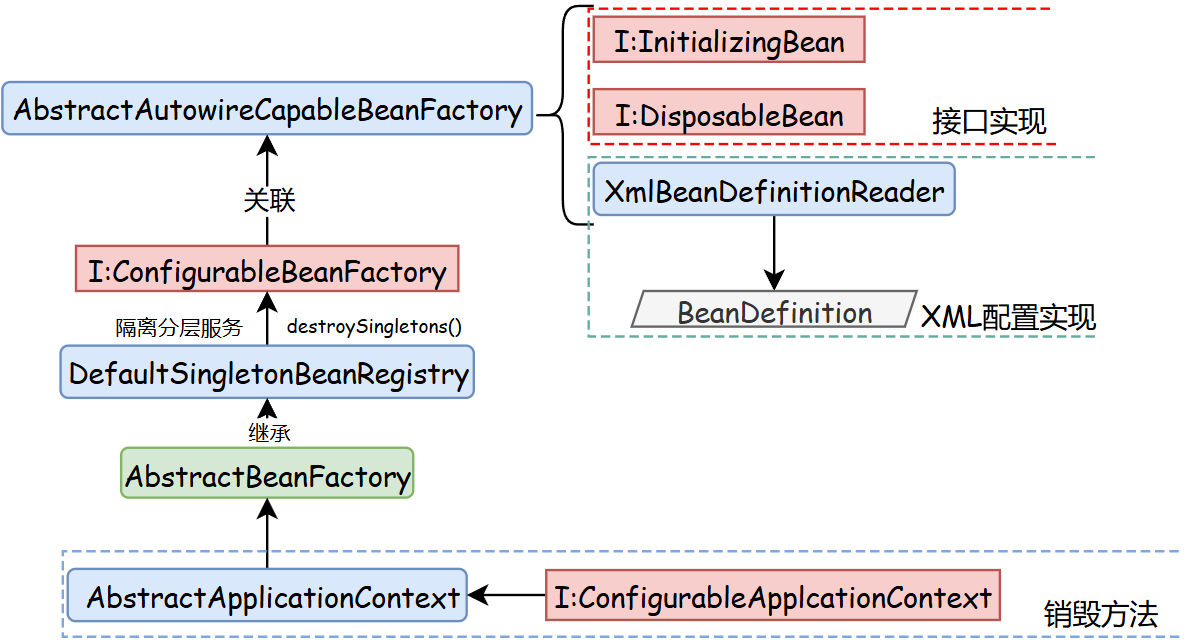
接口 ConfigurableBeanFactory 定义了 destroySingletons 销毁方法,并由 AbstractBeanFactory 继承的父类 DefaultSingletonBeanRegistry 实现 ConfigurableBeanFactory 接口定义的 destroySingletons 方法。这种方式的设计可能是大多数程序员没有用过的,都是用的谁实现接口谁完成实现类,而不是把实现接口的操作又交给继承的父类处理。所以这块还是蛮有意思的,是一种不错的隔离分层服务的设计方式
InitializingBean:
public interface InitializingBean {

    /**
     * Bean 处理了属性填充后调用
     *
     * @throws Exception
     */
    void afterPropertiesSet() throws Exception;

}
DisposableBean:
public interface DisposableBean {

    void destroy() throws Exception;

}
在一些需要结合 Spring 实现的组件中,经常会使用这两个方法来做一些参数的初始化和销毁操作。比如接口暴露、数据库数据读取、配置文件加载等等。
BeanDefinition:
在 BeanDefinition 新增加了两个属性:initMethodName、destroyMethodName,这两个属性是为了在 spring.xml 配置的 Bean 对象中,可以配置 init-method="initDataMethod" destroy-method="destroyDataMethod" 操作,最终实现接口的效果是一样的。只不过一个是接口方法的直接调用,另外是一个在配置文件中读取到方法反射调用
XmlBeanDefinitionReader:
public class XmlBeanDefinitionReader extends AbstractBeanDefinitionReader {

    //Constructor

    //其他方法

    //doLoadBeanDefinitions中增加对init-method、destroy-method的读取
    protected void doLoadBeanDefinitions(InputStream inputStream) throws ClassNotFoundException{
        Document doc = XmlUtil.readXML(inputStream);
        Element root = doc.getDocumentElement();
        NodeList childNodes = root.getChildNodes();

        for (int i = 0; i < childNodes.getLength(); i++) {
            if (!(childNodes.item(i) instanceof Element)) {
                continue;
            }
            if (!"bean".equals(childNodes.item(i).getNodeName())) {
                continue;
            }

            Element bean = (Element) childNodes.item(i);
            String id = bean.getAttribute("id");
            String name = bean.getAttribute("name");
            String className = bean.getAttribute("class");

            //增加对init-method、destroy-method的读取
            String initMethod = bean.getAttribute("init-method");
            String destroyMethodName = bean.getAttribute("destroy-method");

            Class<?> clazz = Class.forName(className);
            String beanName = StrUtil.isNotEmpty(id) ? id : name;
            if (StrUtil.isEmpty(beanName)){
                beanName = StrUtil.lowerFirst(clazz.getSimpleName());
            }

            BeanDefinition beanDefinition = new BeanDefinition(clazz);

            //额外设置到beanDefinition中
            beanDefinition.setInitMethodName(initMethod);
            beanDefinition.setDestroyMethodName(destroyMethodName);

            for (int j = 0; j < bean.getChildNodes().getLength(); j++) {
                if (!(bean.getChildNodes().item(j) instanceof Element)) {
                    continue;
                }
                if (!"property".equals(bean.getChildNodes().item(j).getNodeName())) {
                    continue;
                }
                //解析标签:property
                Element property = (Element) bean.getChildNodes().item(j);
                String attrName = property.getAttribute("name");
                String attrValue = property.getAttribute("value");
                String attrRef = property.getAttribute("ref");
                Object value = StrUtil.isNotEmpty(attrRef) ? new BeanReference(attrRef) : attrValue;
                PropertyValue propertyValue = new PropertyValue(attrName, value);
                beanDefinition.getPropertyValues().addPropertyValue(propertyValue);
            }

            if (getRegistry().containsBeanDefinition(beanName)) {
                throw new BeansException("Duplicate beanName["+beanName+"] is not allowed");
            }
            getRegistry().registerBeanDefinition(beanName,beanDefinition);
        }
    }
}
AbstractAutowireCapableBeanFactory:
相较于之前的实现,本次向该接口中新增了:
// 注册实现了 DisposableBean 接口的 Bean 对象
        registerDisposableBeanIfNecessary(beanName, bean, beanDefinition);
protected void registerDisposableBeanIfNecessary(String beanName, Object bean, BeanDefinition beanDefinition) {
        if (bean instanceof DisposableBean || StrUtil.isNotEmpty(beanDefinition.getDestroyMethodName())) {
            registerDisposableBean(beanName, new DisposableBeanAdapter(bean, beanName, beanDefinition));
        }
    }
    private Object initializeBean(String beanName, Object bean, BeanDefinition beanDefinition) {
        // 1. 执行 BeanPostProcessor Before 处理
        Object wrappedBean = applyBeanPostProcessorsBeforeInitialization(bean, beanName);

        // 执行 Bean 对象的初始化方法
        try {
            invokeInitMethods(beanName, wrappedBean, beanDefinition);
        } catch (Exception e) {
            throw new BeansException("Invocation of init method of bean[" + beanName + "] failed", e);
        }

        // 2. 执行 BeanPostProcessor After 处理
        wrappedBean = applyBeanPostProcessorsAfterInitialization(wrappedBean, beanName);
        return wrappedBean;
    }
//
    private void invokeInitMethods(String beanName, Object bean, BeanDefinition beanDefinition) throws Exception {
        // 1. 实现接口 InitializingBean
        if (bean instanceof InitializingBean) {
            ((InitializingBean) bean).afterPropertiesSet();
        }

        // 2. 注解配置 init-method {判断是为了避免二次执行初始化}
        String initMethodName = beanDefinition.getInitMethodName();
        if (StrUtil.isNotEmpty(initMethodName) && !(bean instanceof InitializingBean)) {
            Method initMethod = beanDefinition.getBeanClass().getMethod(initMethodName);
            if (null == initMethod) {
                throw new BeansException("Could not find an init method named '" + initMethodName + "' on bean with name '" + beanName + "'");
            }
            initMethod.invoke(bean);
        }
    }
本类是为了调用Bean初始化前后额外处理方法的调用(BeanPostProcessor)
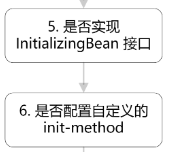
在方法 invokeInitMethods 中,主要分为两块来执行,实现了 InitializingBean 接口的操作,处理 afterPropertiesSet 方法;另外一个是判断配置信息 init-method 是否存在,执行反射调用 initMethod.invoke(bean)。这两种方式都可以在 Bean 对象初始化过程中进行处理加载 Bean 对象中的初始化操作,让使用者可以额外新增加自己想要的动作。
DisposableBeanAdapter:
public class DisposableBeanAdapter implements DisposableBean {

    private final Object bean;
    private final String beanName;
    private String destroyMethodName;

    public DisposableBeanAdapter(Object bean, String beanName, BeanDefinition beanDefinition) {
        this.bean = bean;
        this.beanName = beanName;
        this.destroyMethodName = beanDefinition.getDestroyMethodName();
    }

    @Override
    public void destroy() throws Exception {
        // 1. 实现接口 DisposableBean
        if (bean instanceof DisposableBean) {
            ((DisposableBean) bean).destroy();
        }

        // 2. 配置信息 destroy-method {判断是为了避免二次执行销毁}
        if (StrUtil.isNotEmpty(destroyMethodName) && !(bean instanceof DisposableBean && "destroy".equals(this.destroyMethodName))) {
            Method destroyMethod = bean.getClass().getMethod(destroyMethodName);
            if (null == destroyMethod) {
                throw new BeansException("Couldn't find a destroy method named '" + destroyMethodName + "' on bean with name '" + beanName + "'");
            }
            destroyMethod.invoke(bean);
        }

    }

}
- 可能你会想这里怎么有一个适配器的类呢,因为销毁方法有两种甚至多种方式,目前有
实现接口 DisposableBean、配置信息 destroy-method,两种方式。而这两种方式的销毁动作是由 AbstractApplicationContext 在注册虚拟机钩子后,虚拟机关闭前执行的操作动作。 - 那么在销毁执行时不太希望还得关注都要销毁那些类型的方法,它的使用上更希望是有一个统一的接口进行销毁,所以这里就新增了适配类,做统一处理。
AbstractAutowireCapableBeanFactory:
public abstract class AbstractAutowireCapableBeanFactory extends AbstractBeanFactory implements AutowireCapableBeanFactory {

    private InstantiationStrategy instantiationStrategy = new CglibSubclassingInstantiationStrategy();

    @Override
    protected Object createBean(String beanName, BeanDefinition beanDefinition, Object[] args) throws BeansException {
        Object bean = null;
        try {
            bean = createBeanInstance(beanDefinition, beanName, args);
            // 给 Bean 填充属性
            applyPropertyValues(beanName, bean, beanDefinition);
            // 执行 Bean 的初始化方法和 BeanPostProcessor 的前置和后置处理方法
            bean = initializeBean(beanName, bean, beanDefinition);
        } catch (Exception e) {
            throw new BeansException("Instantiation of bean failed", e);
        }

        // 注册实现了 DisposableBean 接口的 Bean 对象
        registerDisposableBeanIfNecessary(beanName, bean, beanDefinition);

        addSingleton(beanName, bean);
        return bean;
    }

    protected void registerDisposableBeanIfNecessary(String beanName, Object bean, BeanDefinition beanDefinition) {
        if (bean instanceof DisposableBean || StrUtil.isNotEmpty(beanDefinition.getDestroyMethodName())) {
            registerDisposableBean(beanName, new DisposableBeanAdapter(bean, beanName, beanDefinition));
        }
    }

}
- 在创建 Bean 对象的实例的时候,需要把销毁方法保存起来,方便后续执行销毁动作进行调用。
- 那么这个销毁方法的具体方法信息,会被注册到 DefaultSingletonBeanRegistry 中新增加的
Map<String, DisposableBean> disposableBeans属性中去,因为这个接口的方法最终可以被类 AbstractApplicationContext 的 close 方法通过getBeanFactory().destroySingletons()调用。 - 在注册销毁方法的时候,会根据接口类型和配置类型统一交给 DisposableBeanAdapter 销毁适配器类来做统一处理。实现了某个接口的类可以被 instanceof 判断或者强转后调用接口方法
ConfigurableApplicationContext:
public interface ConfigurableApplicationContext extends ApplicationContext {

    void refresh() throws BeansException;

    void registerShutdownHook();

    void close();

}
在 ConfigurableApplicationContext 接口中定义注册虚拟机钩子的方法 registerShutdownHook 和手动执行关闭的方法 close。
AbstractApplicationContext:
public abstract class AbstractApplicationContext extends DefaultResourceLoader implements ConfigurableApplicationContext {

    // ...

    @Override
    public void registerShutdownHook() {
        Runtime.getRuntime().addShutdownHook(new Thread(this::close));
    }

    @Override
    public void close() {
        getBeanFactory().destroySingletons();
    }

}
实现注册钩子和关闭方法
测试
配置文件:
<?xml version="1.0" encoding="UTF-8"?>
<beans>

    <bean id="userDao" class="cn.bugstack.springframework.test.bean.UserDao" init-method="initDataMethod" destroy-method="destroyDataMethod"/>

    <bean id="userService" class="cn.bugstack.springframework.test.bean.UserService">
        <property name="uId" value="10001"/>
        <property name="company" value="腾讯"/>
        <property name="location" value="深圳"/>
        <property name="userDao" ref="userDao"/>
    </bean>

</beans>
测试结果:

定义标记类型Aware接口,实现感知容器对象
本节要实现的目标是,实现感知容器操作的接口,进一步对框架进行拓展。
在关于 Bean 对象实例化阶段我们操作过一些额外定义、属性、初始化和销毁的操作,其实我们如果像获取 Spring 一些如 BeanFactory、ApplicationContext 时,也可以通过此类方式进行实现。那么我们需要定义一个标记性的接口,这个接口不需要有方法,它只起到标记作用就可以,而具体的功能由继承此接口的其他功能性接口定义具体方法,最终这个接口就可以通过 instanceof 进行判断和调用了。
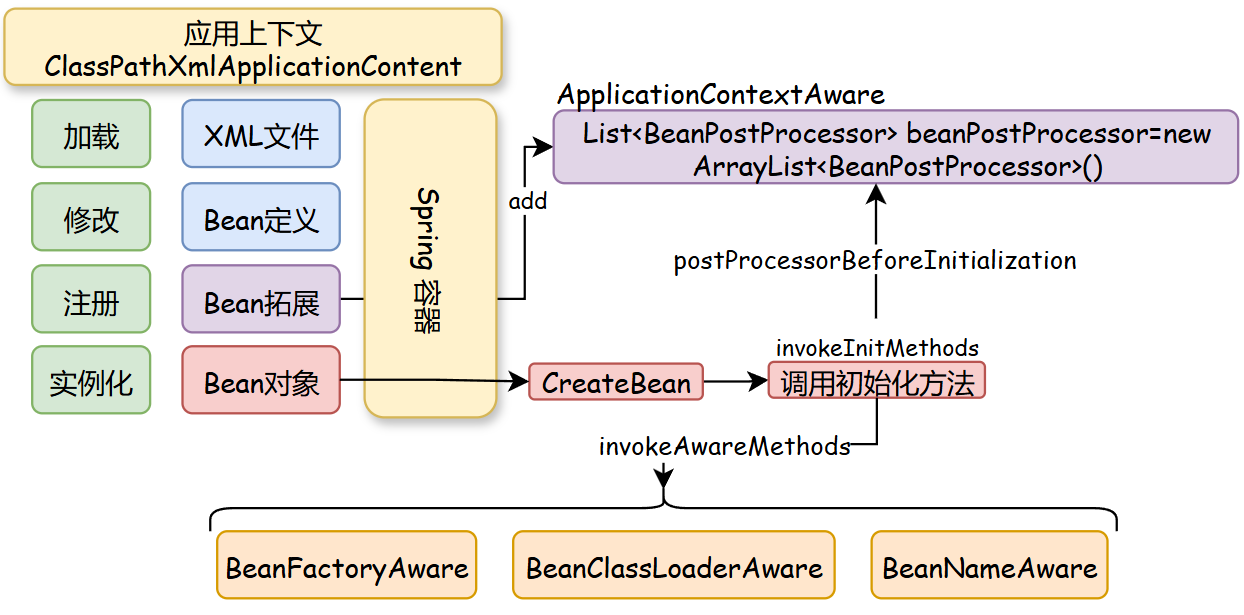
- 定义接口 Aware,在 Spring 框架中它是一种感知标记性接口,具体的子类定义和实现能感知容器中的相关对象。也就是通过这个桥梁,向具体的实现类中提供容器服务
- 继承 Aware 的接口包括:BeanFactoryAware、BeanClassLoaderAware、BeanNameAware和ApplicationContextAware。
- 在具体的接口实现过程中你可以看到,一部分(BeanFactoryAware、BeanClassLoaderAware、BeanNameAware)在 factory 的 support 文件夹下,另外 ApplicationContextAware 是在 context 的 support 中,这是因为不同的内容获取需要在不同的包下提供。所以,在 AbstractApplicationContext 的具体实现中会用到向 beanFactory 添加 BeanPostProcessor 内容的
ApplicationContextAwareProcessor操作,最后由 AbstractAutowireCapableBeanFactory 创建 createBean 时处理相应的调用操作。
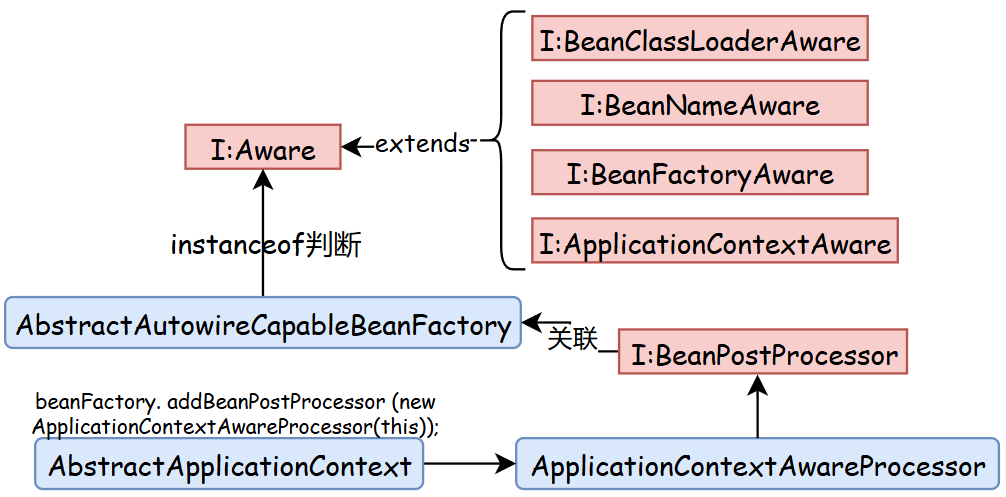
- Aware 有四个继承的接口,其他这些接口的继承都是为了继承一个标记,有了标记的存在更方便类的操作和具体判断实现。
- 由于 ApplicationContext 并不是在 AbstractAutowireCapableBeanFactory 中 createBean 方法下的内容,所以需要像容器中注册
addBeanPostProcessor,再由 createBean 统一调用 applyBeanPostProcessorsBeforeInitialization 时进行操作。
Aware:
/**
 * Marker superinterface indicating that a bean is eligible to be
 * notified by the Spring container of a particular framework object
 * through a callback-style method.  Actual method signature is
 * determined by individual subinterfaces, but should typically
 * consist of just one void-returning method that accepts a single
 * argument.
 *
 * 标记类接口,实现该接口可以被Spring容器感知
 *
 */
public interface Aware {
}
在 Spring 中有特别多类似这样的标记接口的设计方式,它们的存在就像是一种标签一样,可以方便统一摘取出属于此类接口的实现类,通常会有 instanceof 一起判断使用。
BeanFactoryAware:
public interface BeanFactoryAware extends Aware {

   void setBeanFactory(BeanFactory beanFactory) throws BeansException;

}
- Interface to be implemented by beans that wish to be aware of their owning {@link BeanFactory}.
- 实现此接口,就能感知到所属的 BeanFactory。这样的子接口通常只有一个方法,用于接受Spring容器的某个组件。
BeanClassLoaderAware:
public interface BeanClassLoaderAware extends Aware{

    void setBeanClassLoader(ClassLoader classLoader);

}
BeanNameAware:
public interface BeanNameAware extends Aware {

    void setBeanName(String name);

}
ApplicationContextAware:
public interface ApplicationContextAware extends Aware {

    void setApplicationContext(ApplicationContext applicationContext) throws BeansException;

}
ApplicationContextAwareProcessor:
public class ApplicationContextAwareProcessor implements BeanPostProcessor {

    private final ApplicationContext applicationContext;

    public ApplicationContextAwareProcessor(ApplicationContext applicationContext) {
        this.applicationContext = applicationContext;
    }

    @Override
    public Object postProcessBeforeInitialization(Object bean, String beanName) throws BeansException {
        if (bean instanceof ApplicationContextAware){
            ((ApplicationContextAware) bean).setApplicationContext(applicationContext);
        }
        return bean;
    }

    @Override
    public Object postProcessAfterInitialization(Object bean, String beanName) throws BeansException {
        return bean;
    }

}
由于 ApplicationContext 的获取并不能直接在创建 Bean 时候就可以拿到,所以需要在 refresh 操作时,把 ApplicationContext 写入到一个包装的 BeanPostProcessor 中去,再由 AbstractAutowireCapableBeanFactory.applyBeanPostProcessorsBeforeInitialization 方法调用。
AbstractApplicationContext:
public abstract class AbstractApplicationContext extends DefaultResourceLoader implements ConfigurableApplicationContext {

    @Override
    public void refresh() throws BeansException {
        // 1. 创建 BeanFactory,并加载 BeanDefinition
        refreshBeanFactory();

        // 2. 获取 BeanFactory
        ConfigurableListableBeanFactory beanFactory = getBeanFactory();

        // 3. 添加 ApplicationContextAwareProcessor,让继承自 ApplicationContextAware 的 Bean 对象都能感知所属的 ApplicationContext
        beanFactory.addBeanPostProcessor(new ApplicationContextAwareProcessor(this));

        // 4. 在 Bean 实例化之前,执行 BeanFactoryPostProcessor (Invoke factory processors registered as beans in the context.)
        invokeBeanFactoryPostProcessors(beanFactory);

        // 5. BeanPostProcessor 需要提前于其他 Bean 对象实例化之前执行注册操作
        registerBeanPostProcessors(beanFactory);

        // 6. 提前实例化单例Bean对象
        beanFactory.preInstantiateSingletons();
    }

     // ...
}
在addBeanPostProcessor方法中,添加 ApplicationContextAwareProcessor,让继承自 ApplicationContextAware 的 Bean 对象都能感知所属的 ApplicationContext。
AbstractAutowireCapableBeanFactory:
public abstract class AbstractAutowireCapableBeanFactory extends AbstractBeanFactory implements AutowireCapableBeanFactory {

    private InstantiationStrategy instantiationStrategy = new CglibSubclassingInstantiationStrategy();

    @Override
    protected Object createBean(String beanName, BeanDefinition beanDefinition, Object[] args) throws BeansException {
        Object bean = null;
        try {
            bean = createBeanInstance(beanDefinition, beanName, args);
            // 给 Bean 填充属性
            applyPropertyValues(beanName, bean, beanDefinition);
            // 执行 Bean 的初始化方法和 BeanPostProcessor 的前置和后置处理方法
            bean = initializeBean(beanName, bean, beanDefinition);
        } catch (Exception e) {
            throw new BeansException("Instantiation of bean failed", e);
        }

        // 注册实现了 DisposableBean 接口的 Bean 对象
        registerDisposableBeanIfNecessary(beanName, bean, beanDefinition);

        addSingleton(beanName, bean);
        return bean;
    }

    private Object initializeBean(String beanName, Object bean, BeanDefinition beanDefinition) {

        // invokeAwareMethods
        if (bean instanceof Aware) {
            if (bean instanceof BeanFactoryAware) {
                ((BeanFactoryAware) bean).setBeanFactory(this);
            }
            if (bean instanceof BeanClassLoaderAware){
                ((BeanClassLoaderAware) bean).setBeanClassLoader(getBeanClassLoader());
            }
            if (bean instanceof BeanNameAware) {
                ((BeanNameAware) bean).setBeanName(beanName);
            }
        }

        // 1. 执行 BeanPostProcessor Before 处理
        Object wrappedBean = applyBeanPostProcessorsBeforeInitialization(bean, beanName);

        // 执行 Bean 对象的初始化方法
        try {
            invokeInitMethods(beanName, wrappedBean, beanDefinition);
        } catch (Exception e) {
            throw new BeansException("Invocation of init method of bean[" + beanName + "] failed", e);
        }

        // 2. 执行 BeanPostProcessor After 处理
        wrappedBean = applyBeanPostProcessorsAfterInitialization(bean, beanName);
        return wrappedBean;
    }


    @Override
    public Object applyBeanPostProcessorsBeforeInitialization(Object existingBean, String beanName) throws BeansException {
        Object result = existingBean;
        for (BeanPostProcessor processor : getBeanPostProcessors()) {
            Object current = processor.postProcessBeforeInitialization(result, beanName);
            if (null == current) return result;
            result = current;
        }
        return result;
    }

    @Override
    public Object applyBeanPostProcessorsAfterInitialization(Object existingBean, String beanName) throws BeansException {
        Object result = existingBean;
        for (BeanPostProcessor processor : getBeanPostProcessors()) {
            Object current = processor.postProcessAfterInitialization(result, beanName);
            if (null == current) return result;
            result = current;
        }
        return result;
    }

}
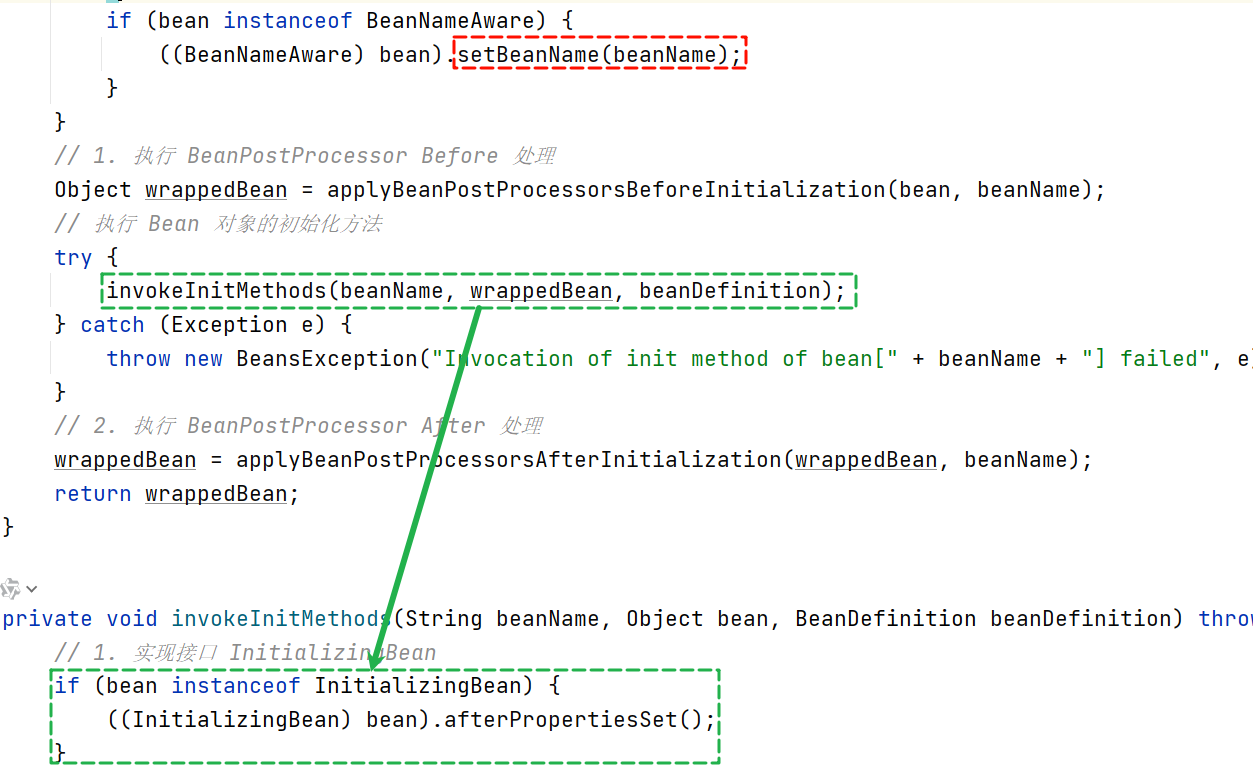
通过判断 bean instanceof Aware,调用了三个接口方法,BeanFactoryAware.setBeanFactory(this)、BeanClassLoaderAware.setBeanClassLoader(getBeanClassLoader())、BeanNameAware.setBeanName(beanName),这样就能通知到已经实现了此接口的类。
至此,由于实现了相关Aware接口,因此Spring容器会在bean初始化时调用有关方法(setApplicationContext()等),传入当前ApplicationContext实例,这样就使得该自定义类可以通过静态方法访问上下文。
当一个bean实现了一个Aware接口,Spring容器会在bean的生命周期中的某个点调用该接口对应的方法,并传递相应的上下文信息作为参数。这个调用发生在bean初始化之后,即@PostConstruct注解的方法或InitializingBean接口的afterPropertiesSet()方法被调用之后。
在代码中的体现:
准备测试类:
public class UserService implements BeanNameAware, BeanClassLoaderAware, ApplicationContextAware, BeanFactoryAware {

    private ApplicationContext applicationContext;
    private BeanFactory beanFactory;

    private String uId;
    private String company;
    private String location;
    private UserDao userDao;

    @Override
    public void setBeanFactory(BeanFactory beanFactory) throws BeansException {
        this.beanFactory = beanFactory;
    }

    @Override
    public void setApplicationContext(ApplicationContext applicationContext) throws BeansException {
        this.applicationContext = applicationContext;
    }

    @Override
    public void setBeanName(String name) {
        System.out.println("Bean Name is:" + name);
    }

    @Override
    public void setBeanClassLoader(ClassLoader classLoader) {
        System.out.println("ClassLoader:" + classLoader);
    }

    // ...get/set
}
UserService 新增加了BeanNameAware, BeanClassLoaderAware, ApplicationContextAware, BeanFactoryAware,四个感知的实现类,并在类中实现相应的接口方法。
小结
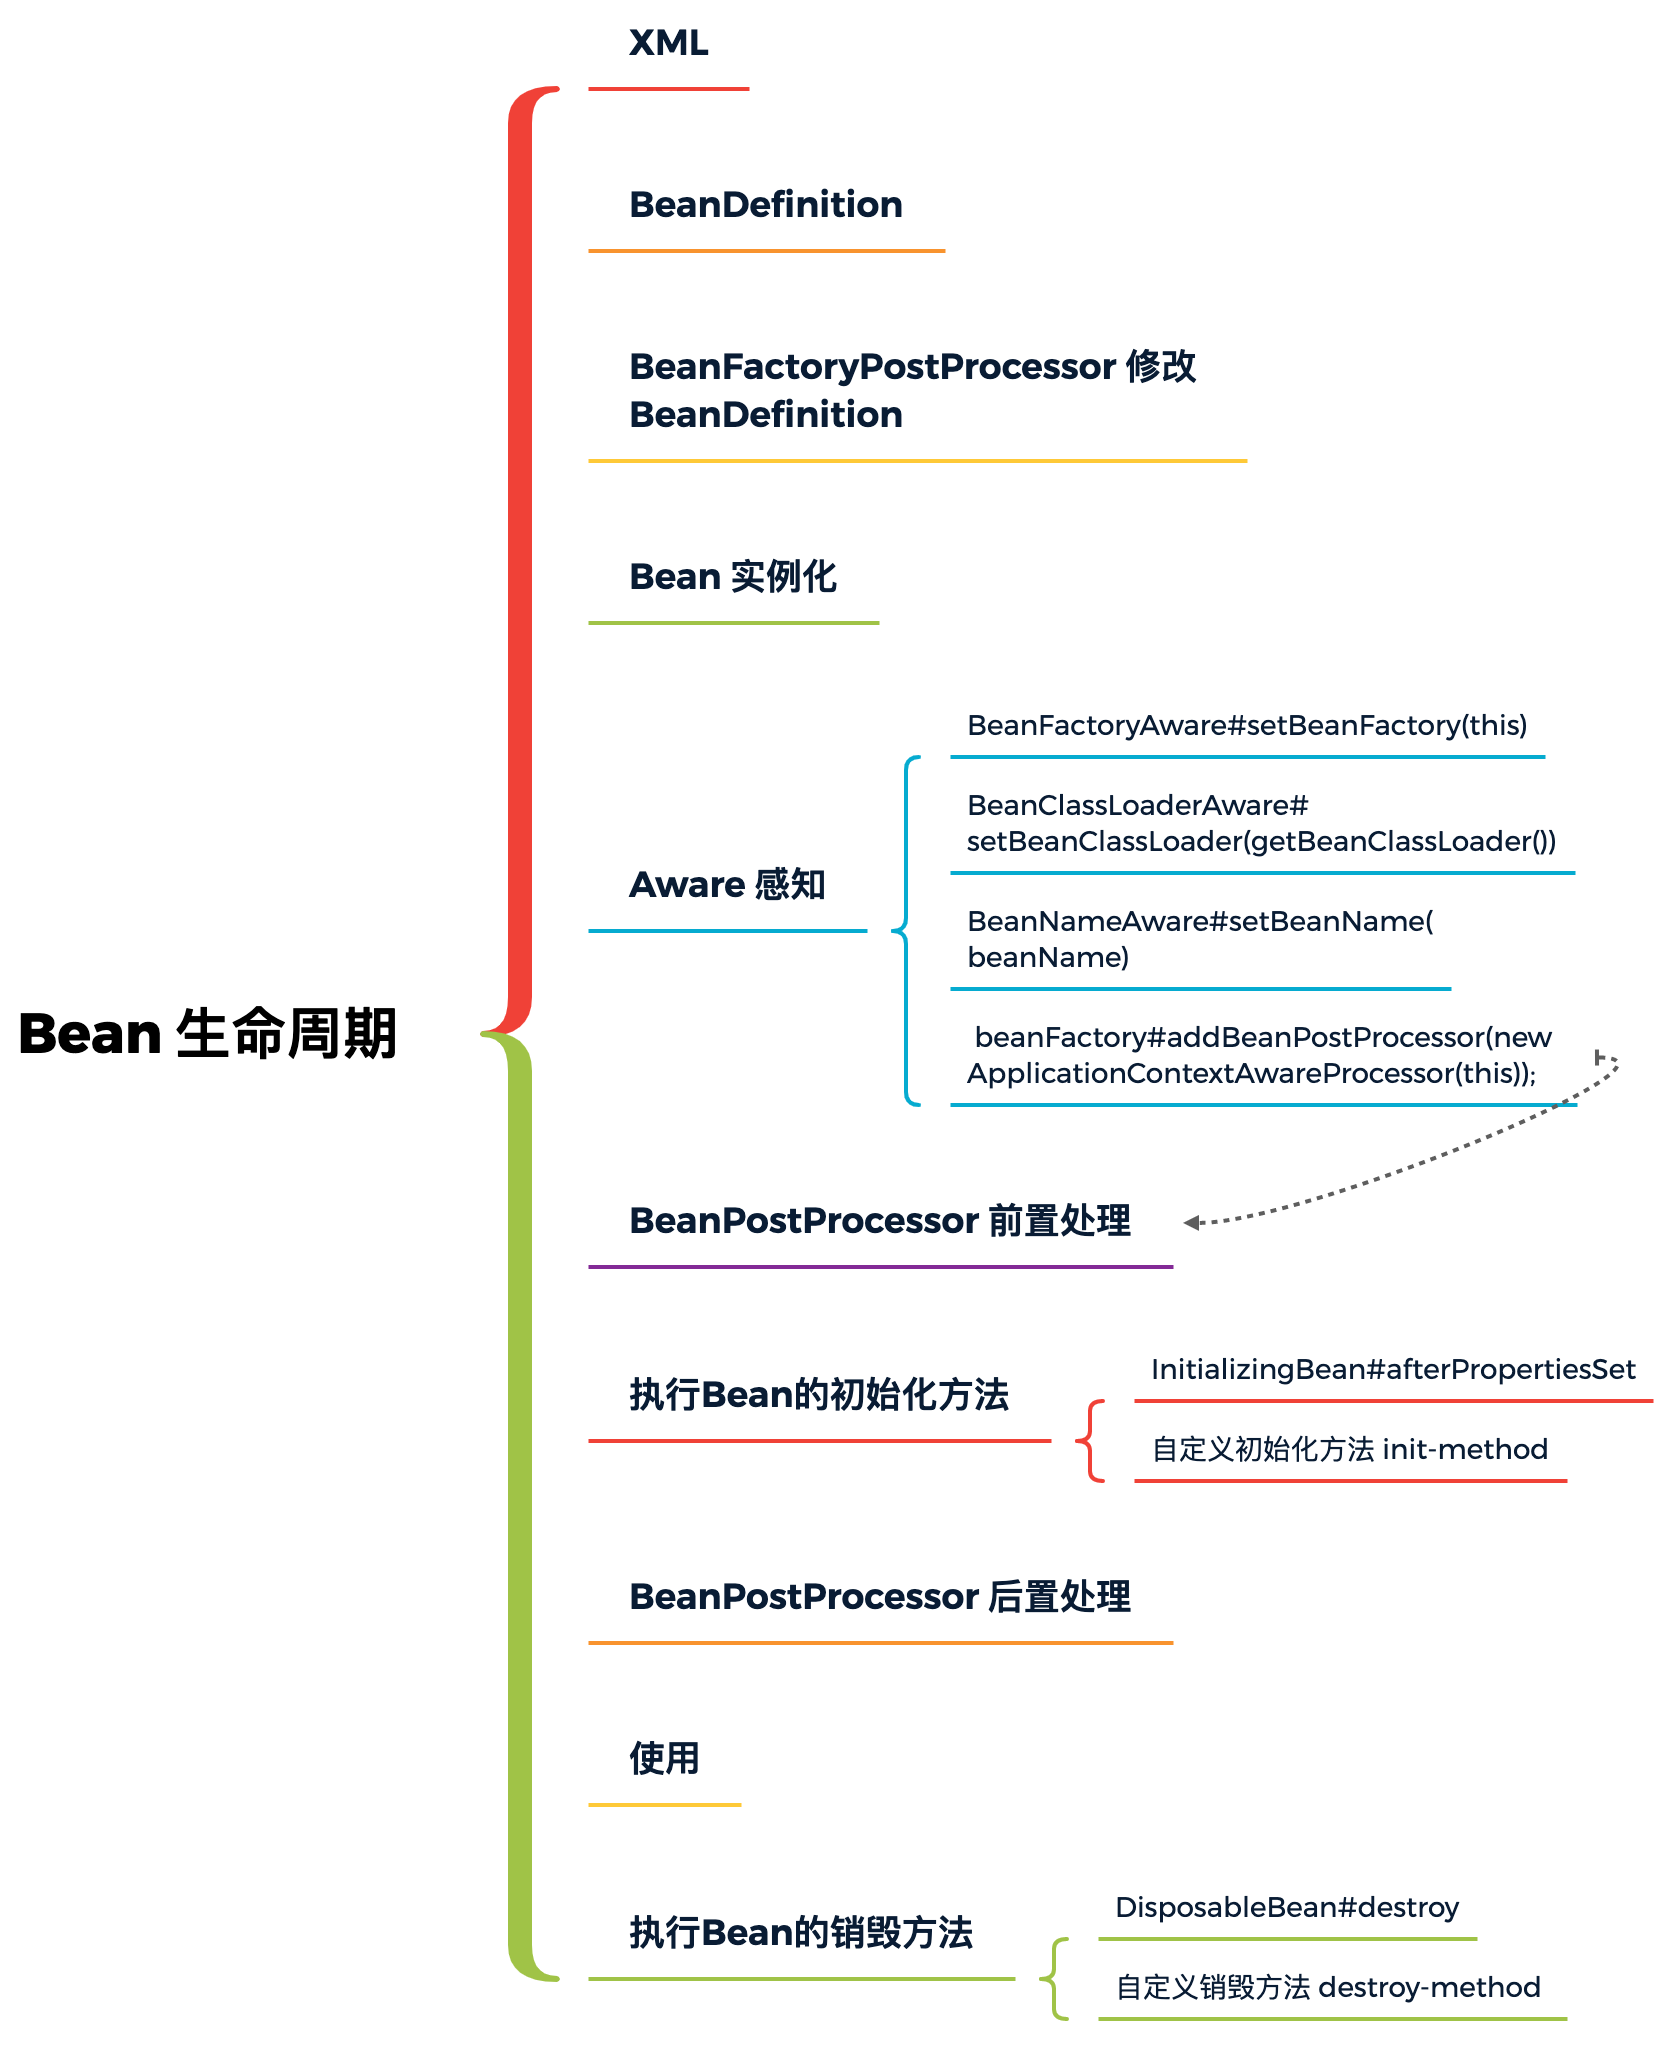
Bean对象作用域以及FactoryBean的实现和使用
类似于MyBatis这样的ORM框架,就是基于把复杂且以代理方式动态变化的对象注册到Spring容器中去。
FactoryBean是Spring框架中的一个重要概念,它的主要作用是允许自定义对象的创建过程。通常情况下,当Spring容器需要创建一个对象时,它会直接调用该类的构造函数。但是,如果一个类实现了FactoryBean接口,那么Spring就会调用FactoryBean的getObject()方法来创建对象,这为对象的创建过程提供了高度的定制化能力。这里的“目标实现”指的是,通过FactoryBean的getObject()方法,可以实现从框架内部获取对象并进行二次加工或封装,从而提供更丰富或更具体的功能。
MyBatis 就是实现了一个 MapperFactoryBean 类(继承自FactoryBean接口),在 getObject 方法中提供 SqlSession 对执行 CRUD 方法的操作
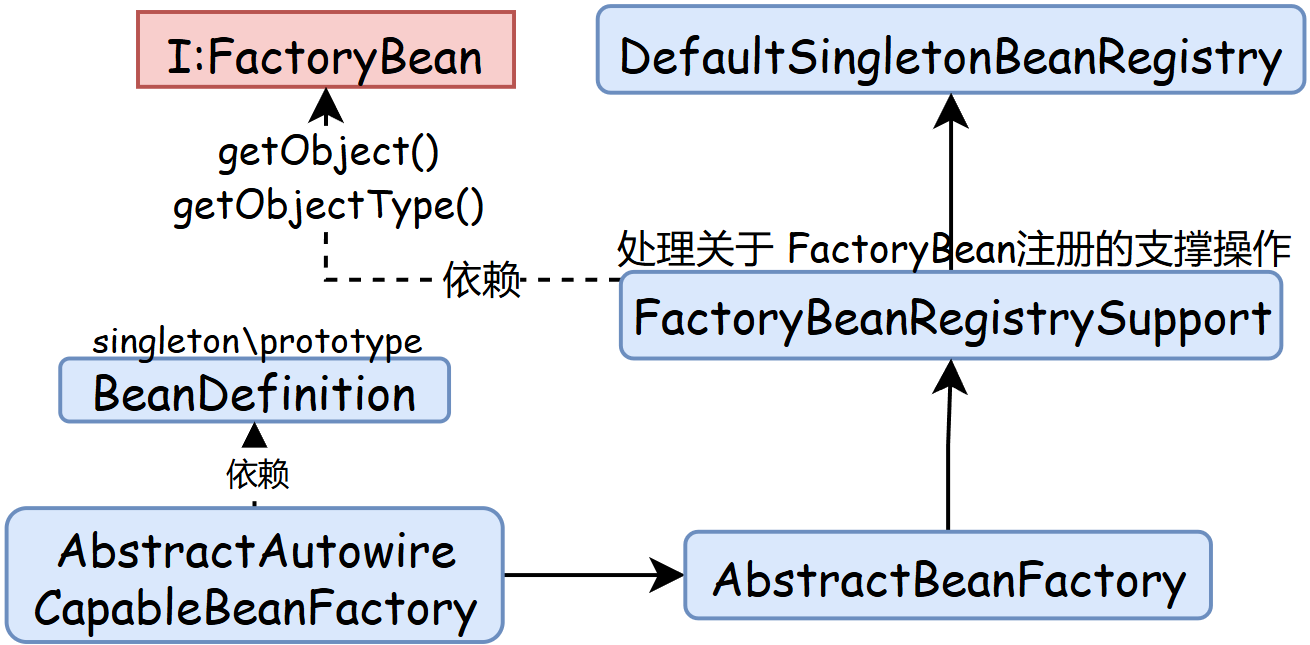
- 整个的实现过程包括了两部分,一个解决单例还是原型对象,另外一个处理 FactoryBean 类型对象创建过程中关于获取具体调用对象的
getObject操作。 SCOPE_SINGLETON、SCOPE_PROTOTYPE,对象类型的创建获取方式,主要区分在于AbstractAutowireCapableBeanFactory#createBean创建完成对象后是否放入到内存中,如果不放入则每次获取都会重新创建。- createBean 执行对象创建、属性填充、依赖加载、前置后置处理、初始化等操作后,就要开始做执行判断整个对象是否是一个 FactoryBean 对象,如果是这样的对象,就需要再继续执行获取 FactoryBean 具体对象中的
getObject对象了。整个 getBean 过程中都会新增一个单例类型的判断factory.isSingleton(),用于决定是否使用内存存放对象信息。

Comments NOTHING